
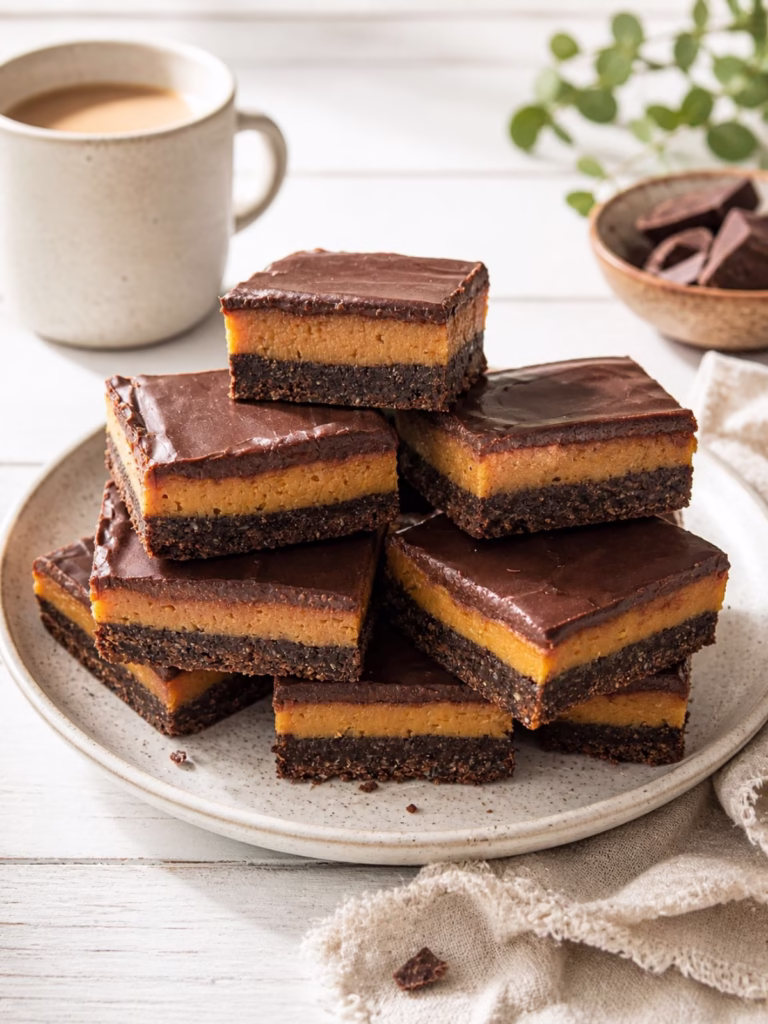
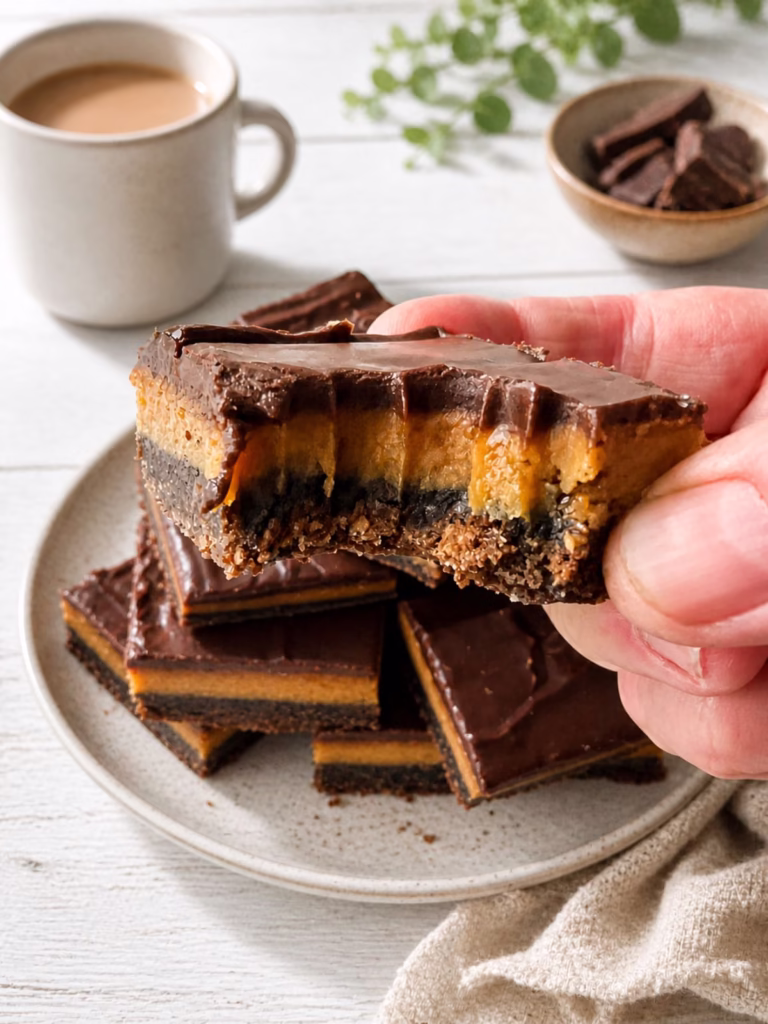
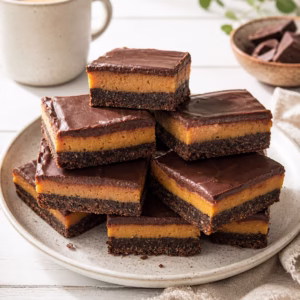
This Chocolate Golden Syrup Caramel Slice is soft, chewy, and made with everyday pantry staples you likely have on hand. You don’t even need a block of chocolate for the top layer, as this version uses a simple cocoa icing so you can make it any time. It starts with a rich cocoa biscuit base, topped with a thick golden syrup caramel that sets beautifully, then finished with a smooth cocoa icing. It still delivers that deep chocolate flavour, with clean layers and a texture that slices well and tastes even better the next day.
What is chocolate golden syrup caramel slice?
Chocolate golden syrup caramel slice is a layered slice made with a cocoa biscuit-style base, a soft golden syrup and condensed milk caramel centre, and a simple cocoa icing to finish it off. It is inspired by the classic caramel slice, but skips the block chocolate layer and uses pantry staples instead.
It is easy to make, holds its shape well once chilled, and gives you that rich chocolate and caramel flavour in every bite.
Why you’ll love this choc caramel slice
- Uses simple pantry ingredients you most likely already have
- NO block of chocolate needed, keeps it more budget friendly and still gives that chocolate hit
- Soft, chewy texture with clean layers
- Easy to make with basic steps
- Great for lunchboxes, sharing, or make ahead
- Holds well in the fridge and slices neatly
- Tastes even better the next day
Ingredients needed
- Plain flour + cocoa powder– Forms the base structure. The cocoa replaces part of the flour and gives that chocolate flavour without using real chocolate.
- Desiccated coconut – Adds texture and a light chew. Helps the base hold together without needing an egg.
- Brown sugar – Sweetens the base and adds a slight caramel note that pairs well with the golden syrup.
- Butter – Binds the base and adds richness. Also used in the caramel and icing for a smooth finish.
- Golden syrup – Used in both the base and caramel. Gives a deep flavour and helps create that soft, chewy texture. Read more about golden syrup here.
- Sweetened condensed milk – The key to the caramel layer. Thickens as it cooks and sets into a smooth, sliceable filling.
- Icing sugar + cocoa powder – Combined to make a simple chocolate-style icing without needing melted chocolate.
- Boiling water – Helps bring the icing together to a smooth, spreadable consistency.
- Salt – Balances the sweetness and lifts the overall flavour
How to make chocolate caramel slice
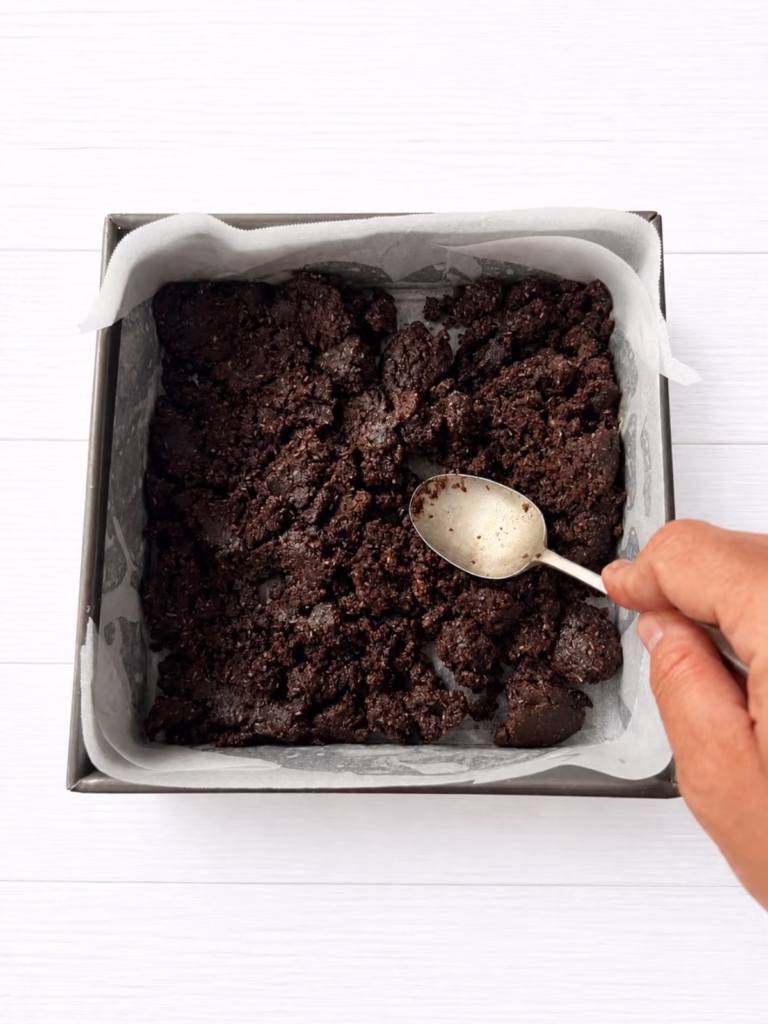
- Preheat oven to 170°C (fan forced) and line a 20 x 20 cm square cake tin with baking paper, leaving some overhang for easy removal.
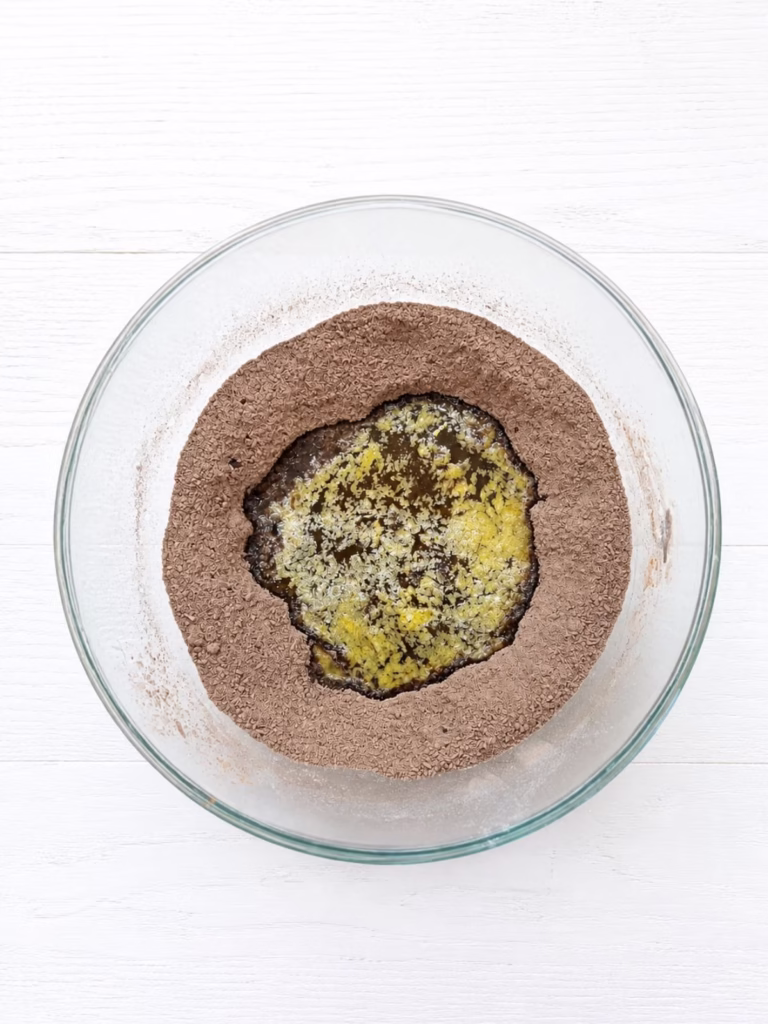
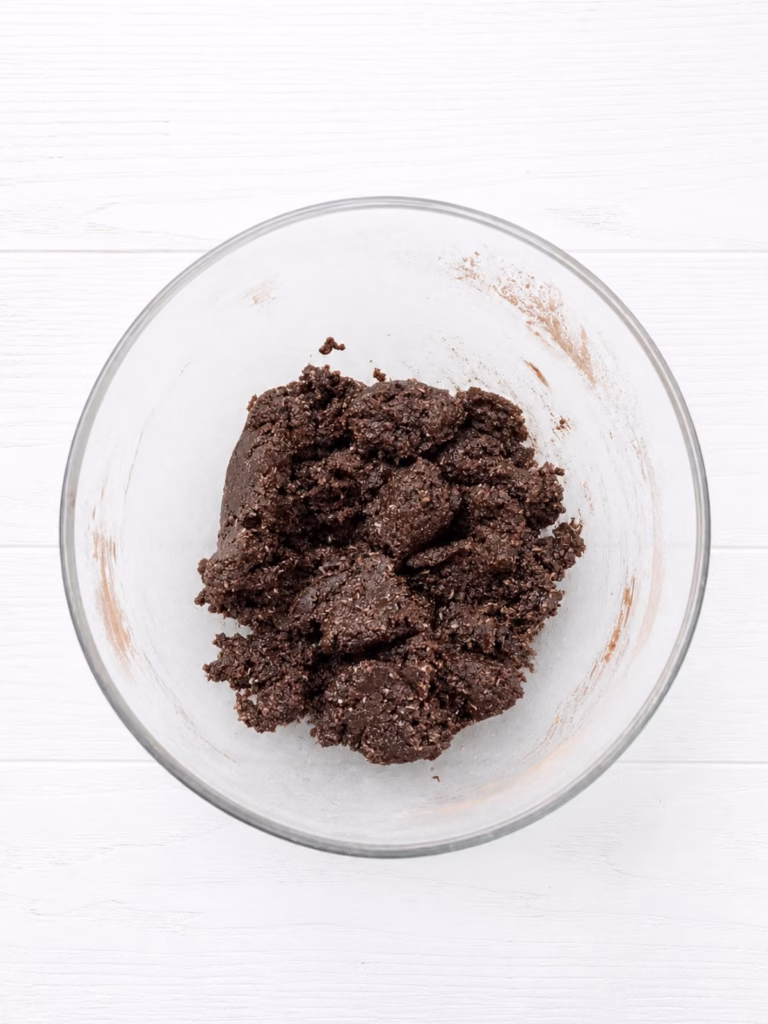
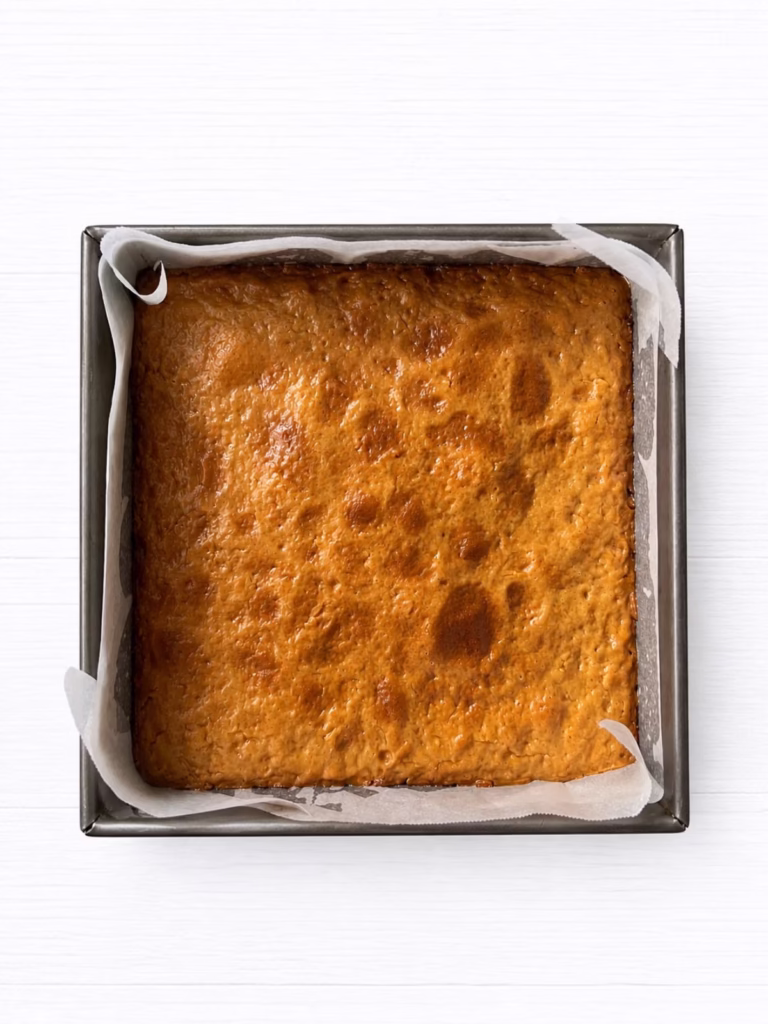
- Make the base. Melt the butter and golden syrup together until smooth. In a bowl, mix the flour, cocoa, coconut, brown sugar, and salt. Add the melted butter mixture and stir until it looks like damp sand. Press firmly into the base of the tin and smooth the surface (I use the back of a spoon for this).
- Bake the base for 15 minutes until the edges are set but the centre is still soft. Remove and let cool slightly.
- Make the caramel. Whilst the slice is cooling, place the condensed milk, golden syrup, and butter into a saucepan. Whisk over a medium-low heat for 7 to 10 minutes until the mixture has thickened slightly, and is glossy and light golden in colour. Remove from heat.
- Pour the caramel over the warm base and spread it evenly. Return to the oven for 15 minutes to or until the caramel is rich golden brown in colour. Remove from oven and cool completely in the tin.
- Make the icing. Mix icing sugar and cocoa, then add the butter and enough boiling water to create a smooth, spreadable icing.
- Spread the icing evenly over the cooled caramel. Chill until firm, then lift from the tin and slice into squares to serve.
Top tips
- Line the tin with overhang so you can lift it out easily
- Press the base firmly into the tin so it holds the caramel layer cleanly
- Keep the caramel on low heat and whisk the whole time so it stays smooth
- Bake the caramel until it is a deep golden brown. This is key for flavour and the right set
- Let the slice cool completely before icing
- Chill before slicing for clean, sharp edges
- Use a hot knife to cut neat squares
- Store in the fridge for the best texture, it firms up and slices better
Serving suggestions
Serve this slice chilled or at room temperature, depending on the texture you prefer. Straight from the fridge gives you clean, firm layers, while room temp softens the caramel slightly for a chewier bite. It works well as a lunchbox treat, an afternoon snack with a cup of tea or coffee, or sliced smaller for a simple dessert platter. You can dust the top lightly with extra cocoa or icing sugar before serving if you want to dress it up a little.
Storage
FRIDGE
Store in an airtight container in the fridge for up to 5 days. This keeps the caramel firm and makes the slice easier to cut cleanly.
REHEAT
No reheating needed. If you prefer a softer texture, let it sit at room temperature for 10 to 15 minutes before serving.
FREEZER
Freeze in an airtight container for up to 3 months. Slice before freezing for easy portions. Thaw in the fridge overnight.
Frequently asked questions
Can I use a different tin size?
Yes, but it will change the thickness. A 20 x 20 cm tin gives you a thick caramel layer. A larger tin will make it thinner and reduce bake time slightly. The next best tin to use would be a brownie/slice tin (28 x 18cm).
Why is my caramel too soft?
It likely needed more cooking on the stove or more time in the oven. It should be thick and glossy before you pour it over the base, and baked until deep golden.
Why is my caramel too firm or chewy?
It has been cooked too long or on too high heat. Keep the heat low and stir the whole time to control the texture.
Can I make this without coconut?
Yes. Replace the coconut with the same amount of flour or rolled oats. Oats will give a slightly chewier texture or you could use almond meal instead.
Why does my base crumble when slicing?
The base may not have been pressed firmly enough or the mixture was too dry. If it feels crumbly, add 1 teaspoon of melted butter or golden syrup and mix again.
Do I need to chill it before slicing?
Yes. Chilling helps the layers set properly and gives you clean, sharp slices.
This is one of those easy slices you’ll come back to when you want something sweet without needing anything fancy. Simple ingredients, great texture, and a solid chocolate caramel hit every time. Give it a go and let me know how it turns out in the comments.
More sweet treats to try
- Brown sugar blueberry banana crumble muffins
- Super moist chocolate birthday cake
- Easy 5-Ingredient chocolate chip cookies
- Choc drizzled macadamia shortbread biscuits
- Sticky ginger cake
Chocolate Golden Syrup Caramel Slice
Equipment
- 20cm square cake pan
Ingredients
base
- ¾ cup plain flour
- ½ cup desiccated coconut
- ½ cup brown sugar
- ¼ cup cocoa powder
- Pinch of salt
- 120g butter
- 1 tablespoon (30g) golden syrup
caramel
- 397g can sweetened condensed milk
- 60g butter, chopped
- 2 tablespoons (60g) golden syrup
icing
- ¾ cup icing sugar mixture
- 1 tablespoon cocoa powder
- 20g butter, chopped
- 1 to 2 tablespoons boiling water
Instructions
- Preheat oven to 170°C (fan forced) and line a 20 x 20 cm square cake tin with baking paper, leaving some overhang for easy removal.
- Make the base. Melt the butter and golden syrup together until smooth. In a bowl, mix the flour, cocoa, coconut, brown sugar, and salt. Add the melted butter mixture and stir until it looks like damp sand. Press firmly into the base of the tin and smooth the surface (I use the back of a spoon for this).
- Bake the base for 12 to 15 minutes until the edges are set but the centre is still soft. Remove and let cool slightly.
- Make the caramel. Whilst the slice is cooling, place the condensed milk, golden syrup, and butter into a saucepan. Whisk over a medium-low heat for 7 to 10 minutes until the mixture has thickened slightly, and is glossy and light golden in colour. Remove from heat.
- Pour the caramel over the warm base and spread it evenly. Return to the oven for 15 to 17 minutes to or until the caramel is rich golden brown in colour. Remove from oven and cool completely in the tin.
- Make the icing. Mix icing sugar and cocoa, then add the butter and enough boiling water to create a smooth, spreadable icing.
- Spread the icing evenly over the cooled caramel. Chill until firm, then lift from the tin and slice into squares to serve.
Notes
- MEASUREMENTS
We use Australia metric measurements. 1 teaspoon = 5ml, 1 tablespoon = 20ml and 1 cup = 250ml. - BASE TEXTURE
The mixture should look like damp sand and hold together when pressed. If it feels too dry, add 1 teaspoon melted butter or golden syrup. - CARAMEL COLOUR
Bake until the top is a deep golden brown. This gives the best flavour and helps the caramel set properly. - FINAL CHOCOLATE LAYER OPTION
If you prefer a classic chocolate top, skip the icing and use this method instead.- Break 180 g milk or dark chocolate into pieces and place in a microwave safe bowl. Melt in 30 second bursts, stirring between each, until smooth
- Stir through 1 teaspoon neutral oil until glossy.
- Pour over the caramel and spread evenly, tilting the tin to cover edge to edge (or use a spatula).
- Refrigerate for at least 1 hour, or until fully set, before slicing.
- CUTTING CLEAN SLICES
Chill well before slicing and use a hot knife for neat edges.


Leave a Reply