
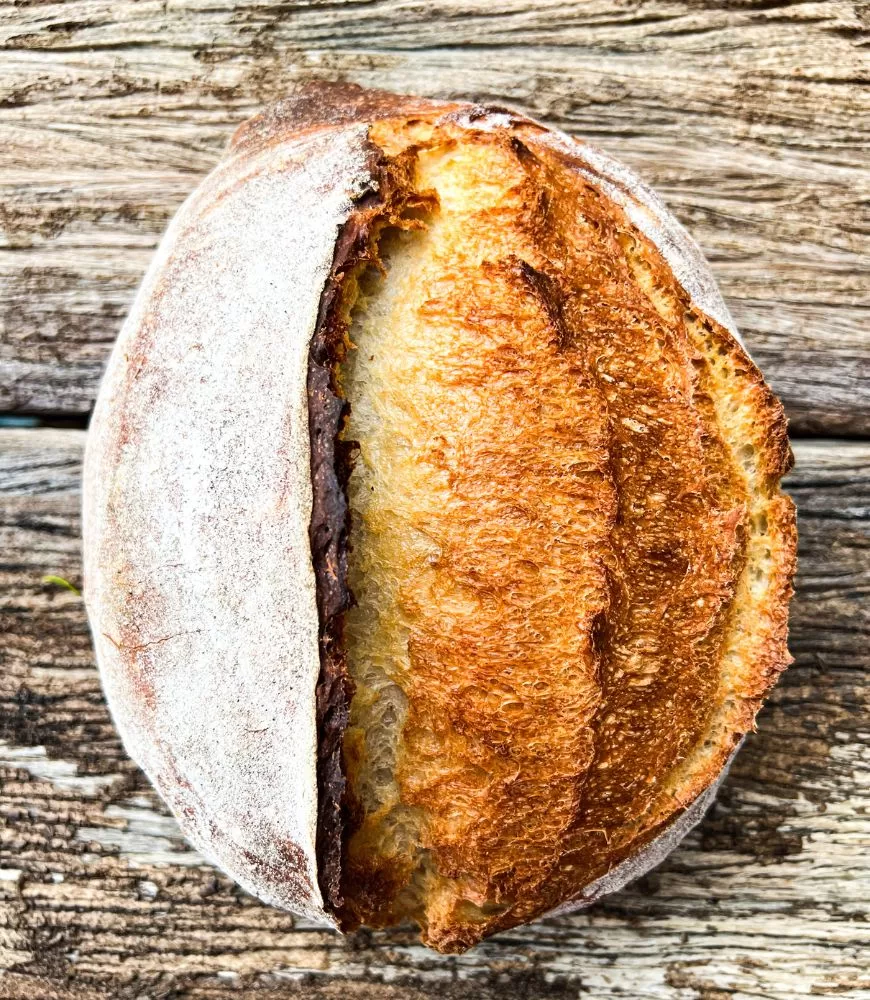
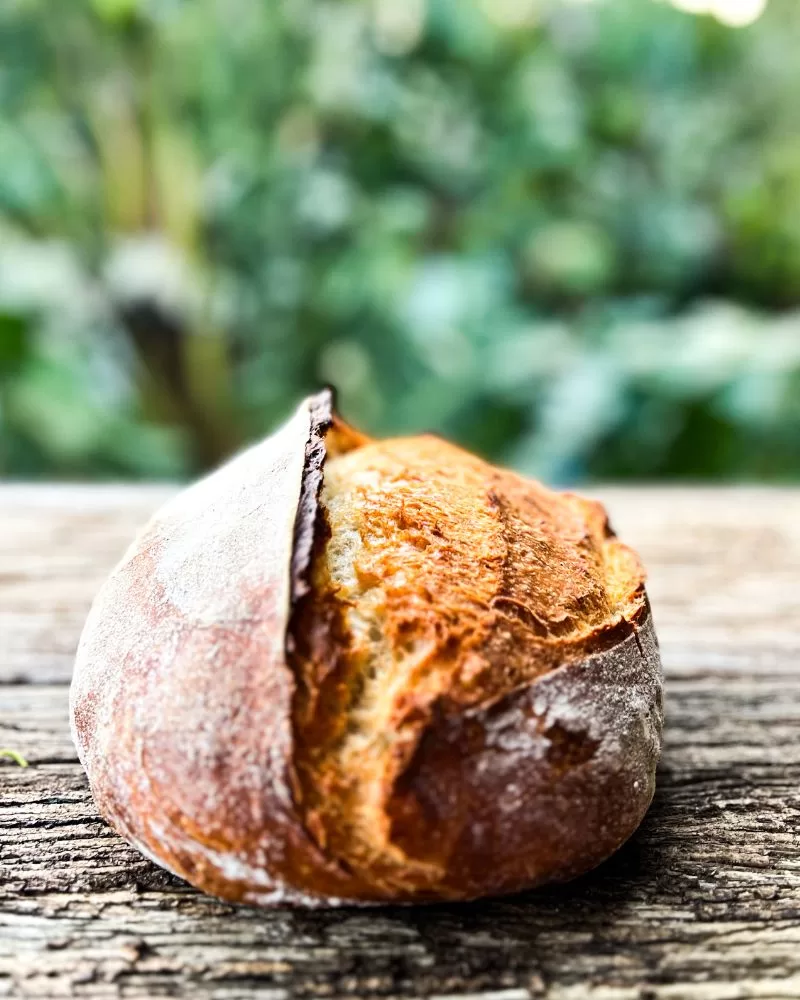
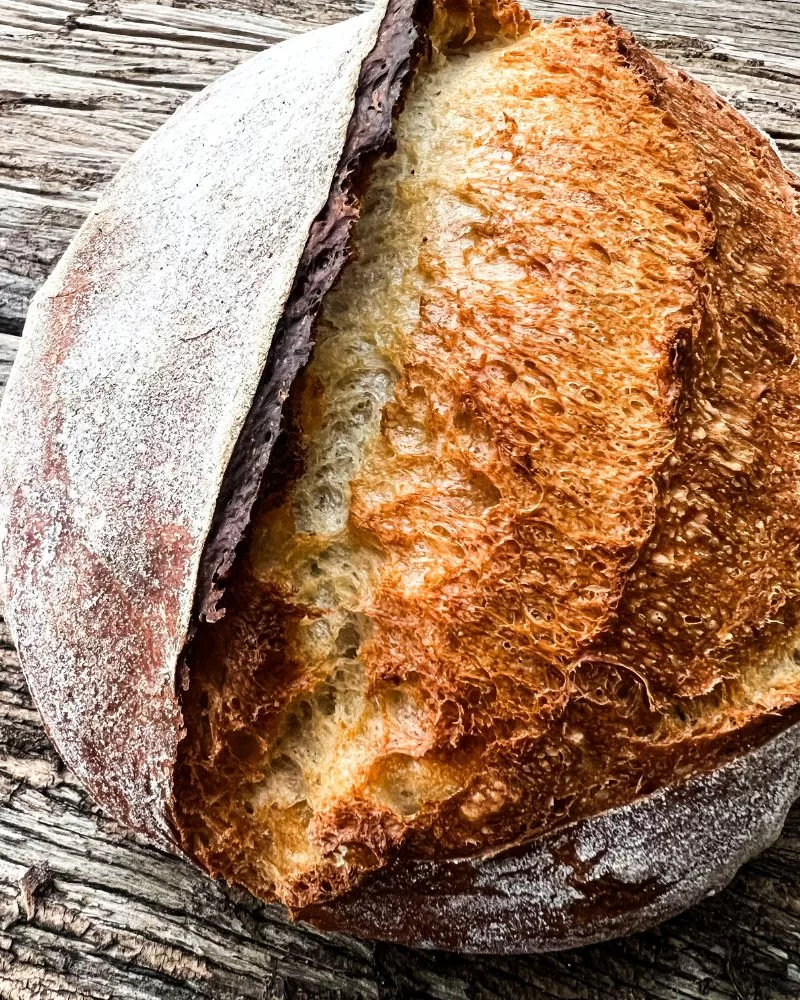
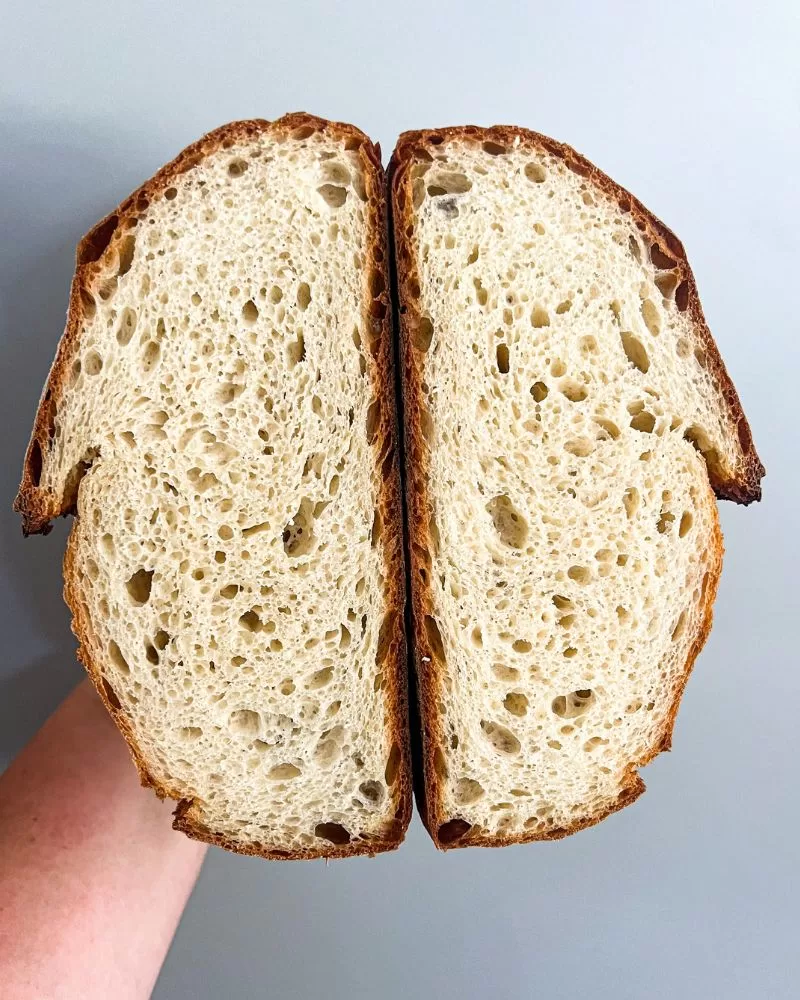
There is something so rustic about a loaf of homemade bread and with my No Knead Crusty Bread, simplicity meets with style to get the best looking bread around. This method combines the ease of traditional no knead bread with a touch of flair through a sourdough-inspired shaping technique. While it requires just a bit more patience, the result is a loaf that delights the eyes with its appearance.
No Knead Bread Techniques
No knead bread has revolutionised home baking by simplifying the process of making delicious, artisan-style bread with minimal effort. Here are some key techniques:
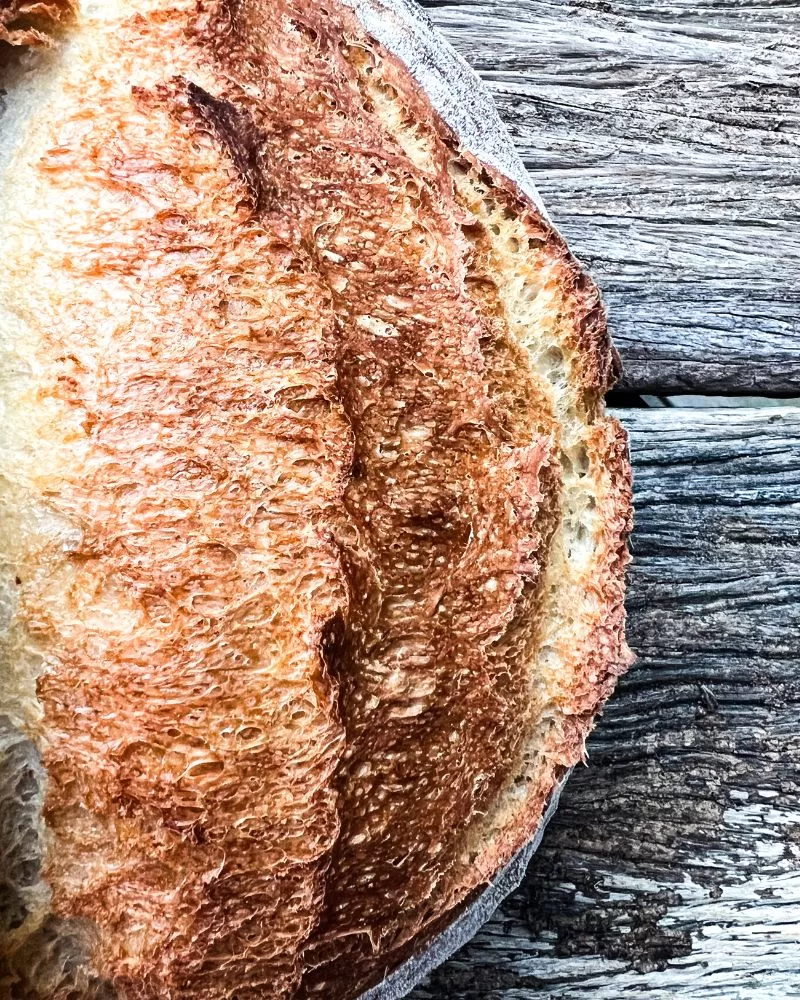
- High Hydration: No knead doughs typically have a high water content, which helps create an open crumb and a chewy texture. This wet dough requires less handling and results in a crisp, airy loaf.
- Minimal Handling: The dough is simply mixed until combined, then left to rise. After fermentation, it’s gently shaped with minimal handling to retain air bubbles for a light, airy crumb.
- Baking in a Dutch Oven: Preheating a Dutch oven and baking the bread inside creates steam, resulting in a beautiful crust. The enclosed environment mimics a professional bread oven.
- Shaping Techniques: While traditional no knead methods involve minimal shaping, by using sourdough techniques in the shaping stage can improve structure and appearance, giving the loaf an artisanal touch.
To make such a beautiful looking loaf of No Knead Bread I choose to use sourdough shaping techniques rather than a quick fold or by using the quick shape and dump method. See the recipe card below for a detailed method on how to achieve this!
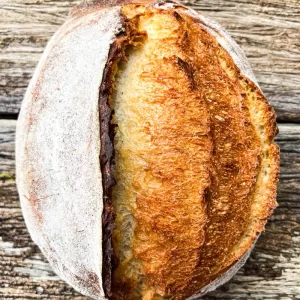
To make a batard shape, like I have, you will need an oval banneton basket (cane or silicon) which you can purchase relatively cheaply from kitchen shops, Temu, Amazon or eBay! You can make do with a long bread basket or any other dish that is oval in shape such as a baking dish for desserts if you have one. If using an item from home, simply line with a clean tea towel and dust liberally with flour to ensure the dough doesn’t stick.
For a batard shape your also going to need an oval Dutch oven or cast iron bread baking pan that the bread can actually fit in. If you want to make this shape though, you can bake this without a Dutch oven. To bake without a Dutch oven, you will need a heavy based baking sheet, pizza stone or baking steel which is preheated in the oven so its extremely hot and also create ‘steam’ in the oven to allow it to rise (this is the purpose of a Dutch oven = steam). Creating steam is easy though, its just a matter of adding some boiling water to a preheated baking dish in the base of the oven after you have loaded the bread in, as quickly as possible then removing the steam (pan with water) after the first 20 minutes then allowing the oven to do the rest.
If you don’t have access to any of these to make a batard, thats absolutely fine – you can simply make this recipe into a boule (round) shape and use any Dutch oven you have at home. Its just matter of shaping into a ball rather than an oval! (See Notes below recipe for loads of tips and how to shape a boule)
~ No Knead Crusty Bread (With Style) ~

No Knead Crusty Bread (With Style)
Equipment
- Dutch Oven (See Notes for other options)
- Oval or round banneton or bowl (See Notes for other options)
- Large bowl
- Electronic scales
- Metal bench scraper (or large flat knife or egg flip etc)
Ingredients
- 300g lukewarm water (approx 37℃)
- 6g honey or caster sugar (1 teaspoon)
- 7g instant dried yeast (2 teaspoons)
- 400g bread flour (or strong high protein bakers flour)
- 8g salt ( 1 ½ teaspoons)
Instructions
MIX THE DOUGH
- Pour water into a large bowl. Add the honey (or sugar) and yeast and mix to combine. Set aside for 5 minutes until foamy. (This means the yeast is active)
- Add the flour and salt to the yeast mixture. Using a dough whisk or spatula, mix until a shaggy dough forms and all flour has been incorporated. You can also use 'wet' hands to mix this. The mix should be shaggy, loose and a bit sticky.
- Cover the bowl with a clean shower cap, cling wrap or a damp tea towel and set aside in a warm place until doubled in size. This should take around 1 hour give or take.
PRE-SHAPING AND BENCH RESTING THE DOUGH
- Gently turn the dough out onto a clean work surface. You can use a silicon dough bowl scraper or lightly wet hands to help ease it out. It’s generally quite a sticky dough but try NOT to use any extra flour here. It will come together!
- Now grab a dough scraper (metal one if possible) and lightly wet both sides. Working quickly, use the scraper to bring one side of the dough up, lift and fold it onto the other side of the dough, like flipping it half. You may need to do this a few times. Then working the scraper around and under the dough, work the dough, pulling it towards you each time, so it starts forming a ball shape and it gets some tension in it. You will find the dough starts to turn into a beautiful tight non-sticky dough ball. Wet your scraper in between if starting to stick at at any time. I don’t recommend using extra flour. Wet fingers/ scrapers is all you need.
- Now that we have a reasonably tight ball, we are going to let it bench rest for 10 minutes or until it starts to flatten out into a disc shape rather than the nice ball it once was. (Sourdough is usually left longer but as this is yeasted bread, it doesn’t take as long). Meanwhile, lightly flour a banneton or long bread basket lined with a clean tea towel with rice flour or all purpose/plain flour. Set aside.
FINAL SHAPING & PROOFING OF A BATARD (SEE BOULE SHAPE IN NOTES)
- Now we can use a bit of flour on the dough. I like to use a rice flour here. Sprinkle the top of the flattened dough with flour to lightly cover. Take a clean bench scraper (no water) and quickly slide it under the dough to loosen it and flip it over, so the flour side of the dough is now bench down. Lightly flour your fingers then pull the dough out at each corner to make a more rectangle shape. When doing this, be as gentle as possible.
- Fold the left half of the dough over to the middle then fold the right side of the dough over the top of the left side so you have a long wide sausage shape. Fold the end of the dough, furthest away from you down to the centre of the dough then using your hands, gently roll up. Place into the banneton seam side UP! Pinch the dough together to seal tightly if you wish. Cover with a shower cap or clean tea towel and allow to proof for 30 minutes if baking immediately or 15 minutes if baking later.
- NOTE: If you want to bake the bread as soon as its finished its final proof, place your Dutch Oven in the oven and preheat to 230℃ at the beginning of this step so its ready and hot to bake immediately. To bake the bread later, after 15 minutes, place the covered banneton with the dough in it, into the fridge for up to 12 hours to retard after the final proof. This is my favourite method as it gains a better flavour and will continue to proof slowly whilst in the fridge.Even placing the dough into the fridge for 1 hour will help you get a better score on the dough since the dough will be firmer, making it much easier to get a nice ear.
BAKING THE DOUGH
- When your ready to bake your bread, place a Dutch oven into the oven and preheat it to 230℃ for at least 30-45 minutes. Grab a piece of baking paper and place it on a flat surface. Turn the dough out of the banneton onto the baking paper, so its seam side down. Using a sharp blade or bread lame, score the top of the dough at a 45 degree angle from one side of the dough to the other side lengthways, (this will produce a nice ear). You can also make other decorative scores in it as well such as wheat scores to make it look pretty if desired.
- Pick up the baking paper, with the dough on it, and place into the Dutch oven. Cover with the lid (careful as it will be HOT) and bake for 25 minutes. Remove the lid and reduce oven temperature to 210C. Bake for a further 10-15 minutes or until the internal temperature of the bread is at least 98C and golden brown and crunchy. Remove the bread and transfer to a wire rack. Allow it to cool for at least 1 hour or longer if time permits.
Notes
- COOKS NOTES:
Oven Temps: Oven temperatures are for conventional, if using fan-forced (convection), reduce the temperature by 20˚C.
Measurements: We use Australian tablespoons and cups: 1 teaspoon = 5 ml, 1 tablespoon = 20 ml & 1 cup = 250 ml.
Herbs: All herbs are fresh (unless specified) and cups are lightly packed.
Vegetables: All vegetables are medium size and peeled, unless specified.
Eggs: We use extra-large size and eggs are 55-60 g each, unless specified. - DUTCH OVEN
A Dutch oven is a heavy-duty cooking pot usually made of cast iron, known for its thick walls and tight-fitting lid. When used for baking bread, it creates an ideal environment for baking artisan-style loaves. Here’s why:- Heat Retention: Cast iron retains heat exceptionally well, ensuring even baking and a crispy crust.
- Steam Retention: The tight lid traps steam released from the bread dough, mimicking the steam injection used in professional ovens. This helps create a moist environment for a better rise and crust.
- Versatility: Apart from bread, Dutch ovens can be used for various cooking methods, such as roasting, braising, and even frying.
- Durability: They are durable and can last a lifetime with proper care, making them a worthwhile investment for home bakers.
- BAKING WITHOUT A DUTCH OVEN
To bake bread using a baking steel, pizza stone, or oven tray, follow this method that works well with all three. Begin by preheating your oven to 240C for at least 45 minutes, ensuring your baking steel, pizza stone, or oven tray is also inside the oven to heat up. Meanwhile, prepare your bread dough according to your recipe, allowing it to go through its final rise. When your dough is ready and the oven is fully preheated, carefully transfer the dough onto a piece of parchment paper. This step makes it easier to move the dough without deflating it. Using a peel or a flat baking sheet, slide the dough along with the parchment paper onto the preheated surface in the oven. Quickly create steam by pouring a cup of hot water into a pan placed on the bottom rack of the oven and by spritzing water into the oven with a spray bottle. This steam helps develop a crispy crust. Bake the bread for 25 minutes then remove the source of steam (aka baking dish with water) and reduce oven temperature to 210C and bake for further 15-20 minutes. Once done, remove the bread from the oven and let it cool on a wire rack for ate least 1 hour before slicing. Using this method, you can achieve excellent results whether you use a baking steel, pizza stone, or oven tray. The key is to ensure that whichever surface you choose is thoroughly preheated to provide the necessary heat and environment for a well-baked loaf. - BANNETON OPTIONS
Instead of using a bread banneton, you can simply use a mixing bowl lined with a clean tea towel which is dusted well with rice flour or plain flour. You just need something to give the bread its shape. For a batard shape, you could use a long bread basket or oven shaped dish. - ALLOW YOUR BREAD TO FULLY COOL BEFORE SLICING
Allowing bread to fully cool before slicing is crucial for several reasons:
- Texture Development: As bread cools, the interior (or crumb) sets and firms up. Slicing too early can result in a gummy or doughy texture, as the starches and proteins in the bread haven’t fully solidified.
- Flavour Enhancement: Cooling allows flavours to develop and mature. The aromas and tastes of the bread become more pronounced as it reaches room temperature.
- Moisture Redistribution: Cooling lets the moisture inside the bread redistribute evenly. Cutting into hot bread can cause steam to escape too quickly, making the bread dry out faster.
- Ease of Slicing: Fully cooled bread is easier to slice evenly. Warm bread can be too soft, causing it to tear or squish under the pressure of a knife, leading to uneven slices and a messy presentation.
- HOW TO SHAPE A BOULE (ROUND LOAF OF BREAD)
- Pre-Shape: After the initial rise (bulk fermentation), gently turn the dough out onto a lightly floured surface. Gently flatten it into a rough rectangle or round shape, being careful not to deflate the dough too much.
- Shape into a Ball: Bring the edges of the dough towards the center, folding them over each other. Rotate the dough slightly and continue folding until you have a tight ball.
- Tension Building: Flip the dough over so the seam side is down. Using your hands, gently cup the dough and rotate it in small circles, pulling it towards you slightly with each rotation to create surface tension. This helps to form a smooth, tight skin on the outside of the boule.
- Rest: Let the shaped boule rest on the counter for a few minutes to relax the gluten.
- Final Proof: Place the boule, seam side up, into a floured proofing basket (banneton) or a bowl lined with a floured kitchen towel. Cover and let it rise(about 30 minutes or 15 minutes then into the fridge for up to 12 hours) until ready to bake.
You may also like
![]()


Leave a Reply