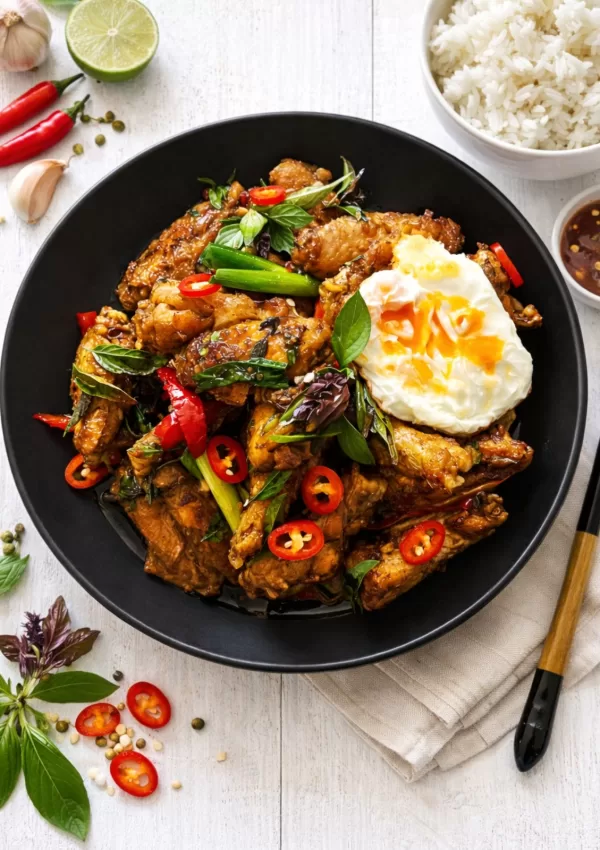
person drinking wine
Hello! I'm Kate.
  • About
  • Contact
  • Image Policy
  • Privacy Policy
  • HOME
  • ABOUT
  • ALL RECIPES
  • Categories
    • Breakfast & Brunch
    • Appetisers & Dips
    • Condiments & Sauces
    • Meat & Poultry
    • Seafood
    • Pasta
    • Salads & Sides
    • Chinese
    • Curries
    • Soups
    • Sweets
    • Vegetables
  • CONTACT

Feed Me Kate

A collection of delicious recipes from my table to yours

Home » Categories » Appetisers & Dips » Grilled Thai Chicken Skewers (Gai Yang)

Appetisers & Dips, Meat & Poultry · July 15, 2023

Grilled Thai Chicken Skewers (Gai Yang)

Jump to Recipe Print Recipe

Prepare to be amazed by these Grilled Thai Chicken Skewers! If you’re a fan of Thai cuisine and crave flavours that truly tantalise your taste buds, look no further. These skewers boast a perfect blend of sweetness, saltiness, boldness, and aromatic goodness. The chicken is nothing short of sublime, and I guarantee you won’t be let down by these delicious skewers!

Gilled chicken skewers on a banana leafwith rice and dipping sauce

Elevate your taste buds with these Grilled Thai Chicken Skewers! They boast the perfect balance of sweetness, a hint of saltiness, and a touch of sourness and spiciness. These skewers are an absolute delight, especially for Thai food lovers. Not only are they delicious, but they’re also easy to make and guaranteed to impress your family and friends. Trust me on this one!

In Thailand, ‘Gai Yang’ translates to ‘grilled chicken.’ Originating from the North, this grilled chicken has gained widespread popularity and can be found on almost every street corner throughout Thailand. While it’s typically prepared as a whole chicken, I prefer using chicken thighs for these skewers to maintain juiciness and make them more convenient to enjoy on sticks.

Having savoured similar delights in Thailand (see picture below), I was inspired to recreate the experience with these skewers.

Thai Street Food in Bangkok When I Visited Back In 2017

How to make

  1. Dice the chicken – cut the thigh fillets into 2-3cm cubes leaving the fat on. This is important as the fat will render down in the cooking process over the grill and keep the chicken extra moist and flavoursome. Place into a bowl or zip-lock bag.
  2. Make the marinade – Place the lemongrass, coriander roots and stems, sugar, chilli, oil, garlic, kecap manis, turmeric and pepper into a Nutri-bullet, high speed blender or small food processor and blend until mostly smooth.
  3. Marinate the chicken – Reserve 1/4 cup of the marinade and chill until ready to cook. Pour remaining marinade over the chicken cubes and stir or massage in well to coat. Cover and chill for at least 8 hours or longer if time permits.
  4. Thread the chicken onto skewers – Thread the marinated chicken pieces onto metal or bamboo skewers (if using bamboo make sure to soak first in water for at least 30 mins) and set aside.
  5. Grill the skewers – heat a barbecue grill plate, charcoal grill or grill pan until hot. Cook the skewers for 7-8 minutes, turning often until lightly charred and almost cooked through. Continue cooking for a further 2-3 minutes and basting each skewer with the reserved marinade until chicken is nicely glazed and chicken has finished cooking through. Remove and allow to rest for 5 minutes before serving.
6 Steps on preparing the Grilled Thai Chicken Skewers.

Expert tips

To elevate your Grilled Thai Chicken Skewers to perfection, consider these expert tips:

  1. Marinate: Allow the chicken to marinate for an extended period, preferably overnight, to maximise flavour absorption.
  2. Soaked Skewers: If using wooden skewers, soak them in water for at least 30 minutes before threading the chicken. This prevents the skewers from burning during the grilling process.
  3. Evenly Sized Pieces: Cut the chicken into uniform-sized pieces to ensure even cooking.
  4. Grilling Time: Keep a close eye on the grilling time to prevent overcooking. The goal is to achieve a juicy and tender interior while maintaining a beautifully caramelised exterior.
  5. Baste: Baste the chicken with any remaining marinade during the grilling process.
  6. Temperature: Use a meat thermometer to ensure that the chicken reaches an internal temperature of 75°C.
  7. Resting: Allow the grilled chicken skewers to rest for a few minutes before serving. This helps redistribute the juices, ensuring each bite is juicy and flavourful.
  8. Marinate & Freeze: marinate the chicken then place into a zip-lock bag and freeze ahead of time. This makes for a quick but delicious dinner when your short on time.
Thai Grilled chicken skewers close up of them
Grilled Thai Chicken Skewers on a banana leaf with Nam Jim Sauce and Rice

Grilled Thai Chicken Skewers

5 from 1 vote
Prepare to be amazed by these Grilled Thai Chicken Skewers! If you're a fan of Thai cuisine and crave flavours that truly tantalise your taste buds, look no further. These skewers boast a perfect blend of sweetness, saltiness, boldness, and aromatic goodness. The chicken is nothing short of sublime, and I guarantee you won't be let down by these delicious skewers!
Print Recipe Pin Recipe
Prep Time:15 minutes mins
Cook Time:15 minutes mins
Marinating Time:8 hours hrs
Total Time:8 hours hrs 30 minutes mins
Course: Dinner
Cuisine: South East Asian, Thai
Keyword: Chicken Skewers, Thai Chicken
Servings: 4 people
Author: Kate Brodhurst

Ingredients

  • 1kg chicken thigh fillets, cut into 2-3cm cubes
  • 1 stick lemongrass, white part only, sliced
  • ½ bunch coriander, roots and stem chopped, leaves reserved
  • 6 cloves garlic
  • ¼ cup fish sauce
  • 2 tablespoons kecap manis  (sweet soy sauce)
  • 1 tablespoon neutral oil  (canola, rice bran, vegetable etc)
  • ½ teaspoon turmeric powder
  • ½ teaspoon cracked black pepper

TO SERVE

  • Steamed jasmine rice
  • Sliced cucumber, red onion and red chilli
  • Coriander sprigs (reserved from marinade)
  • Nam Jim Jaew Sauce (See Notes)

Instructions

MARINATE CHICKEN

  • Place chicken into a glass or ceramic bowl or into a zip-lock bag and set aside.
  • To make the marinade, place all remaining ingredients into a high speed blender, food processor or Nutri-bullet. Blend until smooth. Reserve 1/4 cup of the marinade and set aside. Pour remaining marinade over the chicken and stir or rub into coat well. Chill the chicken and reserved marinade for a minimum of 8 hours but up to 24 hours. We will use the reserved marinade to baste the chicken whilst cooking.

COOK THE SKEWERS

  • Heat a charcoal barbecue, barbecue grill or griddle pan until hot. Meanwhile, thread the chicken onto 8 metal or soaked bamboo skewers (see Notes below). Spray the grill with oil then cook skewers for 7-8 minutes, turning often, or until lightly charred and almost cooked through.
  • Using the reserved marinade set aside earlier, start basting the chicken skewers, turning often for 2-3 minutes or until nicely glazed and chicken is cooked through. Remove and set aside to rest for 5 minutes.
  • Garnish with reserved coriander sprigs and sliced cucumber, red onion and chilli. Serve.

Notes

  1. COOKS NOTES:
    Oven Temps: 
    Oven temperatures are for conventional, if using fan-forced (convection), reduce the temperature by 20˚C.
    Measurements: We use Australian tablespoons and cups: 1 teaspoon = 5 ml, 1 tablespoon = 20 ml & 1 cup =  250 ml.
    Herbs: All herbs are fresh (unless specified) and cups are lightly packed.
    Vegetables: All vegetables are medium size and peeled, unless specified.
    Eggs: We use extra-large size and eggs are 55-60 g each, unless specified.
  2. BAMBOO SKEWERS
    Bamboo skewers will do better if soaked prior to using as it delays the process of them charring and burning so quickly. Place bamboo skewers into a flat baking tray or dish and cover with warm water. Allow to sit for at least 30 minutes prior to threading the meat onto them.

You may also enjoy

  • Thai Chicken Larb – amazing fresh and vibrant Thai Salad
  • Thai Red Pumpkin Curry – this is a beautiful curry made with a large wedge of baked tender pumpkin
  • Thai Basil Chicken Wings – this recipe uses the humble chicken wing rather than breast, thigh or ground chicken mince
  • Thai Pork Cakes with Cucumber Dipping Sauce – the perfect entree to start off your Thai feast!
  • Thai Prawn & Pork Spring Rolls – a delicious and fancy starter for a Thai meal
  • Thai Chicken Satay Baguettes

Loading

Posted In: Appetisers & Dips, Meat & Poultry

Get on the List

You’ll Also Love

close up of chicken schnitzel with saladBanging Chicken Schnitzel with Herby Green Salad
Peruvian Chicken with Green Sauce in a bowl with avocado salsa, brown rice and lime. Napkin underneath the platePeruvian Roast Chicken with Green Sauce
Satay Chicken Curry with Jimmy’s Sate Sauce

Comments

  1. Louise says

    September 7, 2023 at 9:39 PM

    5 stars
    Excellent recipe, family loved it.
    And was easy to follow Kate’s instructions.
    Very tasty, and I’m looking to try some more over the next few days.

    Reply
    • Feed Me Kate says

      September 8, 2023 at 2:05 PM

      Thanks for the 5 star rating Louise. So glad you enjoyed the skewers! Kate x

      Reply

Leave a Reply Cancel reply

Your email address will not be published. Required fields are marked *

Recipe Rating


Next Post >

Thai Chicken Larb Salad (Larb Gai)

About Photo
Hi there! I'm Kate, an avid food lover and cooking enthusiast. Join me on a global culinary adventure as I whip up a storm with my favourite dishes from around the world. From my kitchen to yours, discover easy, delicious, and sometimes unique recipes that might just become your new favourites!

Stay Updated

Search

EXPLORE CATEGORIES

  • Appetisers & Dips
  • Breakfast & Brunch
  • Chinese
  • Condiments & Sauces
  • Curries
  • Meat & Poultry
  • Pasta
  • Salads & Sides
  • Seafood
  • Soups
  • Sweets
  • Vegetables

Trending Now

hey there!

I'm eager to hear about your culinary creations! If you've tried a recipe from Feed Me Kate, please share your thoughts and suggestions in the comments section below each recipe. Your feedback is greatly appreciated. Thanks for visiting! Cheers, Kate x

BROWSE BY COURSE

  • Breakfast & Brunch
  • Appetisers & Dips
  • Condiments & Sauces
  • Meat & Poultry
  • Seafood
  • Salads & Sides
  • Vegetables
  • Pasta
  • Soups
  • Sweets

Latest on Instagram

Penang Chicken Curry!! Been a bit cold and windy Penang Chicken Curry!!

Been a bit cold and windy here the last 2 days so a curry was definitely on the table!! 

So easy and delicious to whip up. I love all Thai curries but Penang is my partners absolute fave so this was for him!! I of course add heaps of chilli to mine as I like a good kick 🌶️ 

Have a fab Friday and an awesome weekend!! 😎💜😊

#penang #chickenpenang #chickencurry #thaicurry #thaipenang #kaffirlimeleaves #chilli #chickendinner #easycurry #currypaste #coconutcream #feedmekate
Asian Pork & Broccolini Bowls ✨RECIPE✨ These Asian Pork & Broccolini Bowls ✨RECIPE✨

These pork bowls are SOOOO quick and easy to make and everyone, including the kids will enjoy it!

Not a fan of pork? Simply swap the pork mince out for extra lean beef, chicken or turkey!  You could also swap the broccolini out for snow peas, more green beans, Asian greens, zucchini or regular broccoli. 🥦 Simply use what’s you have or what your family enjoys! It’s very versatile - leave the chilli 🌶️ out or add more depending on your heat tolerance. 😎

Have a Happy day 🌺🌈

RECIPE ⬇️

Asian Pork & Broccolini Bowls
 
INGREDIENTS: - Serves 4

1 tablespoon oil
3 cloves garlic, finely chopped 
1/2 long red chilli, deseeded and finely chopped (Optional)
500g Extra Lean pork mince (or your choice of mince)
2 bunches broccolini, cut into 3cm lengths
1 cup chopped green beans
2 spring onions, cut into 3cm lengths

STIR-FRY SAUCE:
1/4 cup oyster sauce
1/4 cup water
1 tablespoon kecap manis
1 tablespoon soy sauce
2 teaspoons sesame oil
2 teaspoons brown sugar or honey
2 teaspoons cornflour

TO SERVE:
Cooked rice of choice 
Finely shredded carrot
Spring onions, sliced, extra to garnish
Herb to garnish if desired (I used some Thai basil as that’s what I had)

1 Combine Stir-Fry Sauce ingredients in a jug or bowl until throughly combined. Set aside.
2 Heat oil in a large frying pan over medium high heat. Add the garlic and chilli (if using) and cook for 30 seconds. Crumble in the pork mince then cook, breaking up with a spoon for 5 minutes or until cooked through. 
3 Add the broccolini and green beans. Cook, stirring for 2 minutes or until just starting to soften. Add the prepared Stir-Fry Sauce and the spring onions and cook for a further 1-2 minutes or until vegetables are just soft (but still a little crunchy) and the sauce has thickened.
4 Serve with rice and garnish with shredded carrot, extra spring onions, sliced red chilli (if using) and a sprig of herbs. Enjoy 😊 

#asianbowl #healthypork #highprotein #quickdinner #mincerecipe #oystersauce #porkstirfry #easymealprep #feedmekate #foodandbeverageonly #homecookcollective #healthiermeals
HEALTHY ZUCCHINI FRITTERS Recipe! This was lunch HEALTHY ZUCCHINI FRITTERS Recipe! 

This was lunch yesterday! Couple of my zucchini fritters with a poached egg, green leafy salad and a side of cherry tomatoes, red onion and some @stickybalsamic pearls. 

You could of course do so many things with these fritters. Serve with bacon, avocado, toast, smoked salmon, in a sandwich or wrap…the list is endless. 

Recipe below. I made them in my Thermomix but I have given directions for using a food processor. You could even just mix in a bowl. Just make sure you squeeze as much liquid as possible from the zucchini. You want the mixture to be quite firm so that you can almost shape them in the palm of your hand 🖐️ 

HEALHTY ZUCCHINI FRITTERS

Makes 8 

600g zucchinis
2 teaspoons salt, divided
100g grated mozzarella
50g grated light cheese
2 spring/green onions, roughly chopped
1/2 cup fresh parsley leaves
1/2 cup basil leaves
1 teaspoon dried oregano leaves
1 1/2 teaspoon garlic granules
1/2 teaspoon ground cumin
1/2 teaspoon pepper
1 egg
75g (1/2 cup) wholemeal self-raising flour
125g can corn kernels, drained

1 Grate the zucchini into a bowl. Add the 1 teaspoon of the salt and mix to combine. Transfer onto a clean tea towel, chux or cheesecloth and wring out to remove as much liquid as possible. (Squeeze this really well then squeeze again)

2 Place cheese, spring/green onions, parsley, basil, oregano, garlic granules, cumin, pepper and remaining salt into a food processor. Mix until throughly combined. 

3 Add the zucchini, egg and flour. Process until combined. Add the corn and fold through. The mixture should be quite firm . If it’s too wet, add some more flour. (you almost want to be able to shape them with your hands kinda firm).

4 Heat a drizzle of olive oil in a non-stick pan over medium heat. Add 4 heaped spoonful of the mixture and flatten with the back of a spatula. Cook for 4-5 minutes each side or until golden brown and cooked through. Repeat with remaining mixture and a little more oil. Cool on a wire rack  and serve as desired. 

#zucchinifritters #healthyfood #healthyzucchinifritters #fritters #zucchiniandcornfritters #poachedegg #easylunch #snacktime #feedmekate #foodandbeverageonly
Loaded Vietnamese Chicken & Soba Noodle Salad! I Loaded Vietnamese Chicken & Soba Noodle Salad!

I was craving a noodle salad yesterday so l did a fridge rummage and this baby was made! Was bloody delicious!

No recipe today as I literally just cooked some soba noodles and added whatever veggies, herbs and some poached chicken I had in the fridge, topped with noc cham dressing, sesame seeds, a few peanuts and chilli! Voila

Have a lovely Thursday 💕🌸💕

#vietnamesesalad #healthysalad #asiansalad #feedmekate #salad #foodandbeverageonly #poachedchickensalad #sobanoodles #edamame
WHITE BEAN SOUP WITH SPINACH & BACON - Healthy & L WHITE BEAN SOUP WITH SPINACH & BACON - Healthy & Low Fat! 

I usually make this soup with prosciutto but I didn’t have any so some very lean eye bacon did the trick! 

Perfect for lunches! I serve with a slice of my homemade chai sourdough bread 🥖 

Happy Monday Friends 😊

White Bean Soup with Prosciutto & Spinach

Serves 4
Prep 15 minutes
Cook 25 minutes 

1 tablespoon olive oil
1 red onion, diced
2 each carrots and celery sticks, diced
2 teaspoons each crushed garlic and fresh thyme leaves
100g prosciutto, fat trimmed, torn into bite size pieces OR lean bacon, chopped
400g can diced tomatoes
2 cups prepared vegetable stock
½ cup small pasta shapes
400g can cannellini beans, drained and rinsed (white beans)
2 cups baby spinach leaves
Harissa paste, to taste or chilli flakes

1 Heat olive oil in a large saucepan over medium high heat. Add onion, carrots, celery, garlic, thyme and prosciutto and cook, stirring, for 10 minutes or until well softened.
2 Add the tomatoes, stock and 2 cups water. Bring to the boil. Reduce heat and simmer for 5 minutes. Add the pasta and cook for a further 10 minutes or until pasta is justtender.
3. Remove from heat and stir through the spinach, cannellini beans and harissa paste to taste . Stand for 1 minute. Season to taste. Serve with fresh crunchy bread of choice. 

(I used a Smokey harissa paste which adds a spicy kick with a beautiful depth of flavour)

#whitebeans #cannellinibeans #cannellinibeansoup #healthysoups #lowfatsoup #lowfat #healthyfood #soups #spinach #babyspinach #feedmekate #foodsndbeverageonly #homecookcollective #soupsoupsoup #harissa
Healthy Thai Basil Beef Stir Fry What you’ll n Healthy Thai Basil Beef Stir Fry 

What you’ll need:

Serves 4
Time 20 min

2 tablespoons oyster sauce
1 tablespoon each kecap manis, soy sauce and fish sauce
2 teaspoons brown sugar
400g rump steak, trimmed of all visible fat, thinly sliced
3 cloves garlic, finely diced
1 long red chilli, cut into thick slices, optional
3 spring/green onions, cut into 4cm lengths 
1/2 each red and yellow capsicum , thinly sliced
1 cup each chopped green beans and broccoli florets
1 cup Thai basil leaves

1 Combine oyster sauce, kecap manis, soy, fish sauce, brown sugar and 1 tablespoon water in a small bowl stirring until sugar has dissolved. Set aside. 
2 Heat a wok over high heat and spray lightly with oil. Add half the beef, stir-fry for 1-2 min or until just browned. Transfer to a bowl and repeat with remaining beef. Set aside.
3 Spray wok again with oil, add the garlic, spring/green onions and capsicum, stir-fry for 2 min. Add the beans, broccoli and 2 tablespoons water, stir-fry for 1-2 min. Return beef to wok along with any juices and add the sauce. Stir-fry for a further 1 min. Remove from heat and stir through the Thai basil. Serve with cooked brown  rice. Garnish with extra fresh Thai basil leaves.


Happy Sunday ☀️ 

#thaibasil #thaibasilbeef #thairecipes #healthy #lowfat #healthyrecipe #beef #stirfry #stirfryrecipe #healthyeating #feedmekate #foodandbeverageonly
Spiced Salmon with Couscous, Vegetables and Balsam Spiced Salmon with Couscous, Vegetables and Balsamic Pearls. 

This was such a healthy and delicious dinner!

I pretty much had a fridge raid on my vegetable drawer! I roasted some cauliflower, zucchini, red onion and capsicum and also did some steamed greens 🥦 

For the salmon , I made a dry rub with smoked paprika, garlic powder, onion powder, chilli flakes, brown sugar, dried oregano and S & P.  I lightly oiled the fish then sprinkled the rub over to coat. Baked in a 180C air fryer for 6 minutes! 

I served all this with @ainsleyfoodscompany Moroccan medley couscous, a light sprinkle of crumbled feta and topped it off with the lovely  @stickybalsamic balsamic pearls for a burst of flavour in every bite!! (See Link in bio)

It was a cracker of a dish my friends 💚🍣

Have. fabulous Friday 🥂 😁

#affiliate #stickybalsamicpearls #healthyeating #salmondinner #couscous #roastedveggies #airfryerrecipes #spices #feedmekate #homecookcollective #bowlfood #lowfatdinner #salmon #atlanticsalmon #balsamic #stickybalsamic
Follow Me!
  • About
  • Contact
  • Image Policy
  • Privacy Policy

Copyright © 2025 Feed Me Kate · Theme by 17th Avenue