
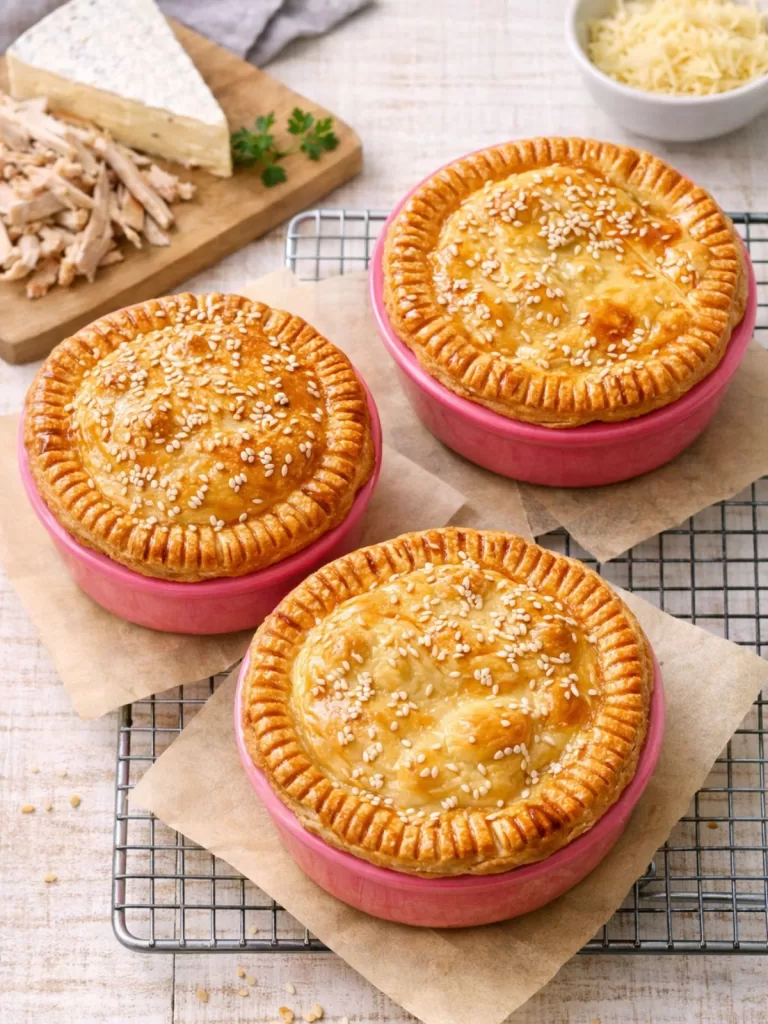
Golden, creamy and everything you want in a homemade pie
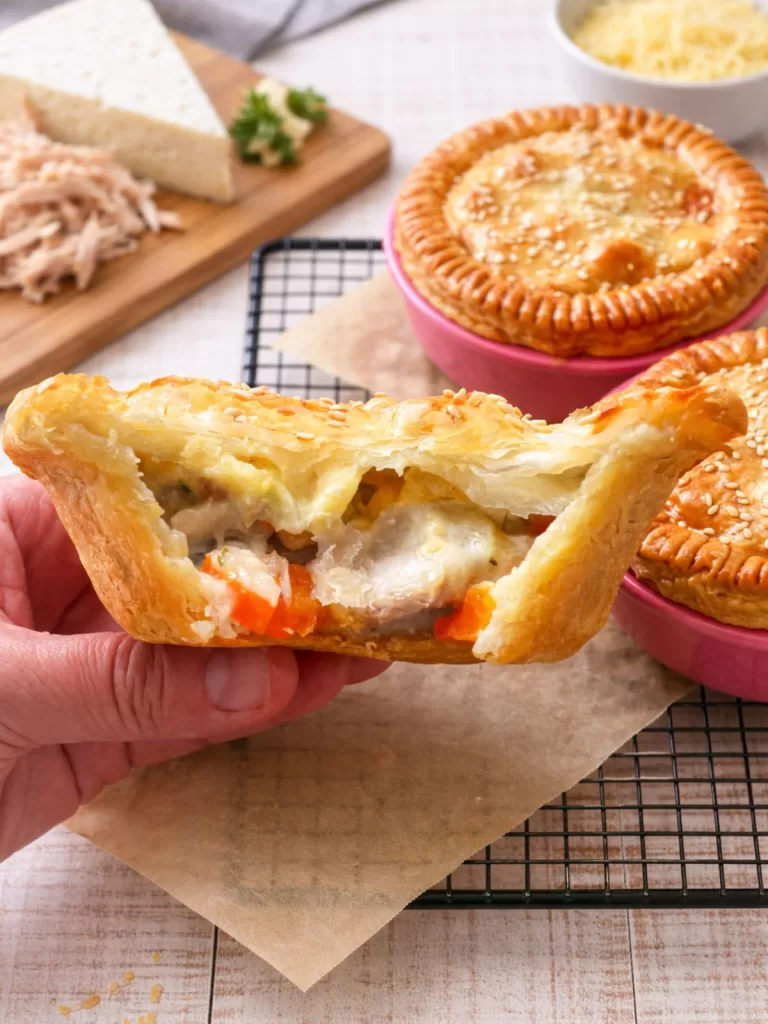
These Chicken and Camembert Pies are the ultimate comfort food – creamy chicken filling, tender veggies, melty Camembert and crisp, golden pastry. They’re simple to prepare, freeze brilliantly and taste far better than anything you’ll find at the local bakery. Perfect for dinner, meal prepping or stocking the freezer for busy nights.
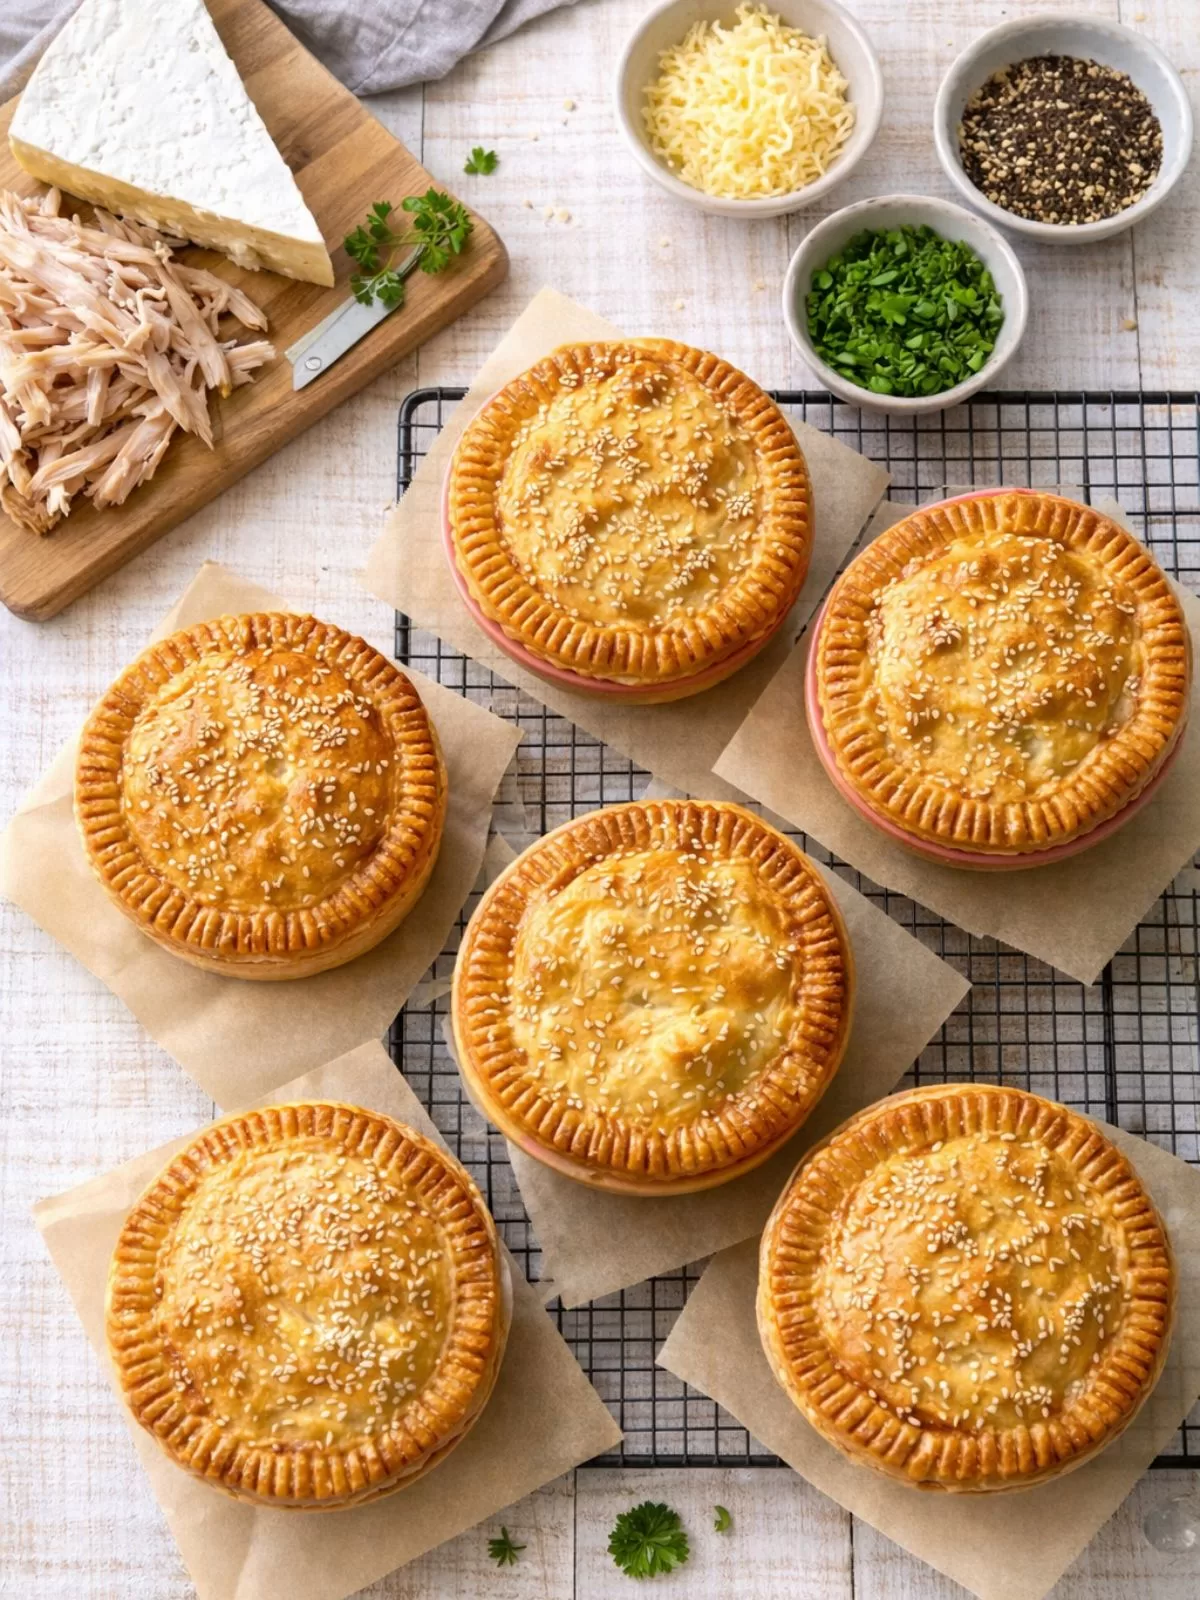
There’s something about a homemade pie that just feels like a warm hug. These became a regular in my kitchen after one too many disappointing bakery attempts – all pastry, barely any filling, and never enough flavour. So I started making my own, and once I added Camembert to the mix… well, that was it. Now this is one of those recipes I pull out when I want guaranteed comfort without the fuss.
Why You’ll Love these Chicken and Camembert Pies
- Big, creamy flavour packed into the simplest filling
- Far better than store-bought pies – with real chunks of chicken and actual cheese
- Filling can be prepped in advance or frozen for later
- Customise the cheese, herbs or veggies to suit what you have
- Works as individual pies, one large family pie or even in a pie maker
- Freezer-friendly and perfect for quick meals
How to Make the Chicken Pies
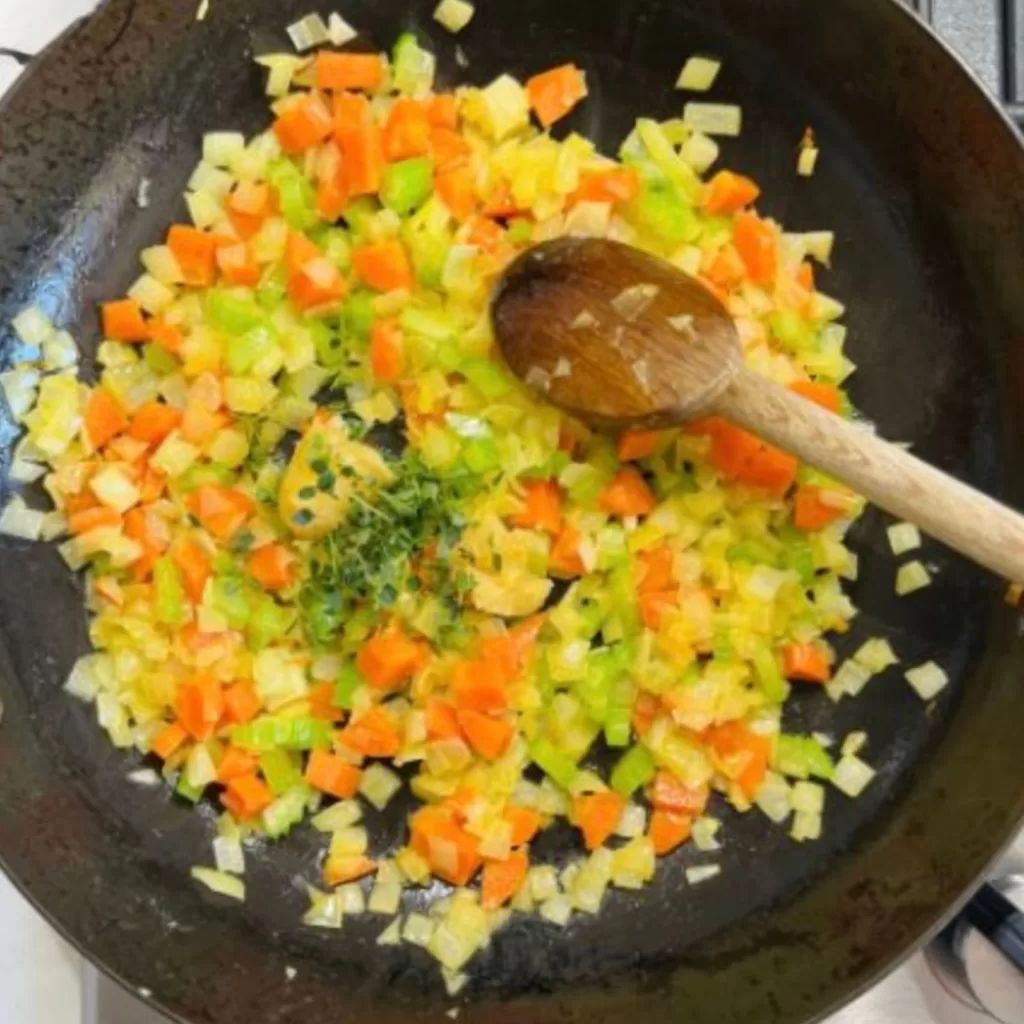
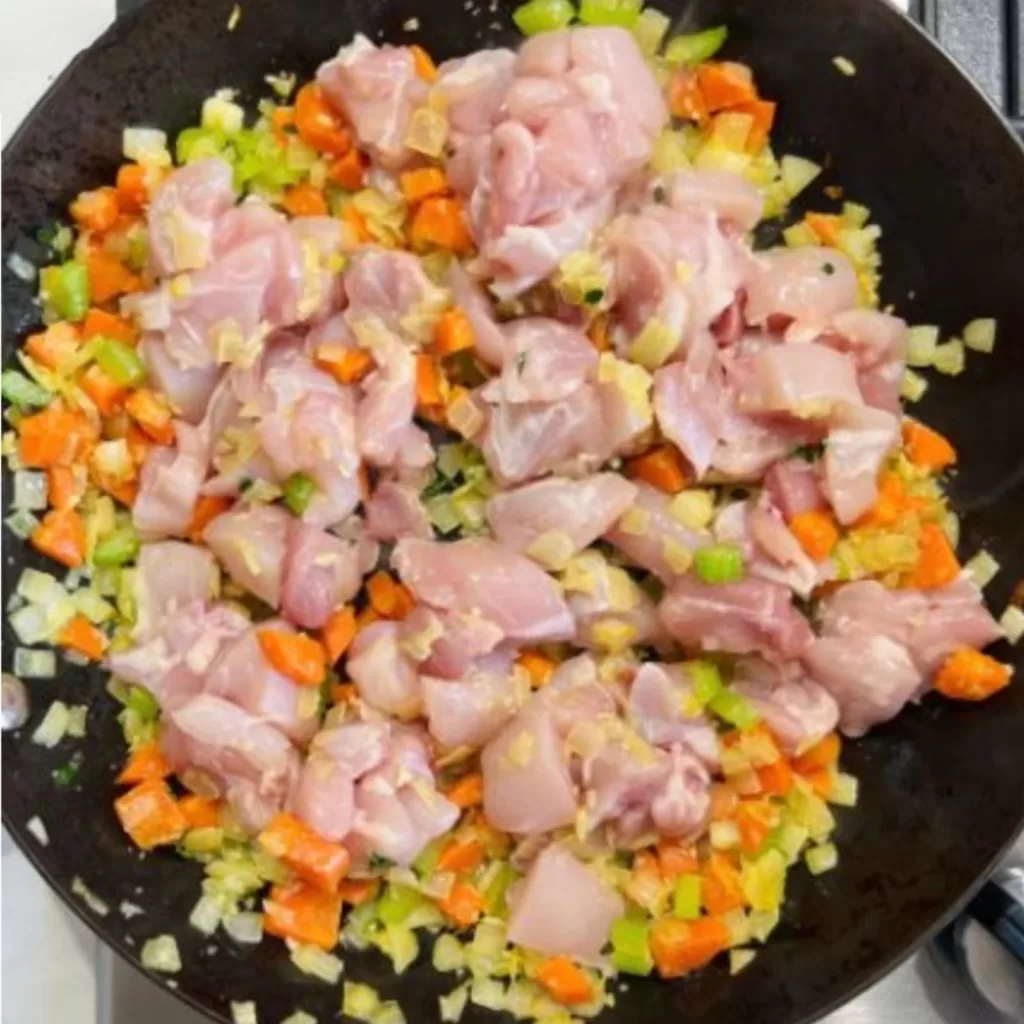
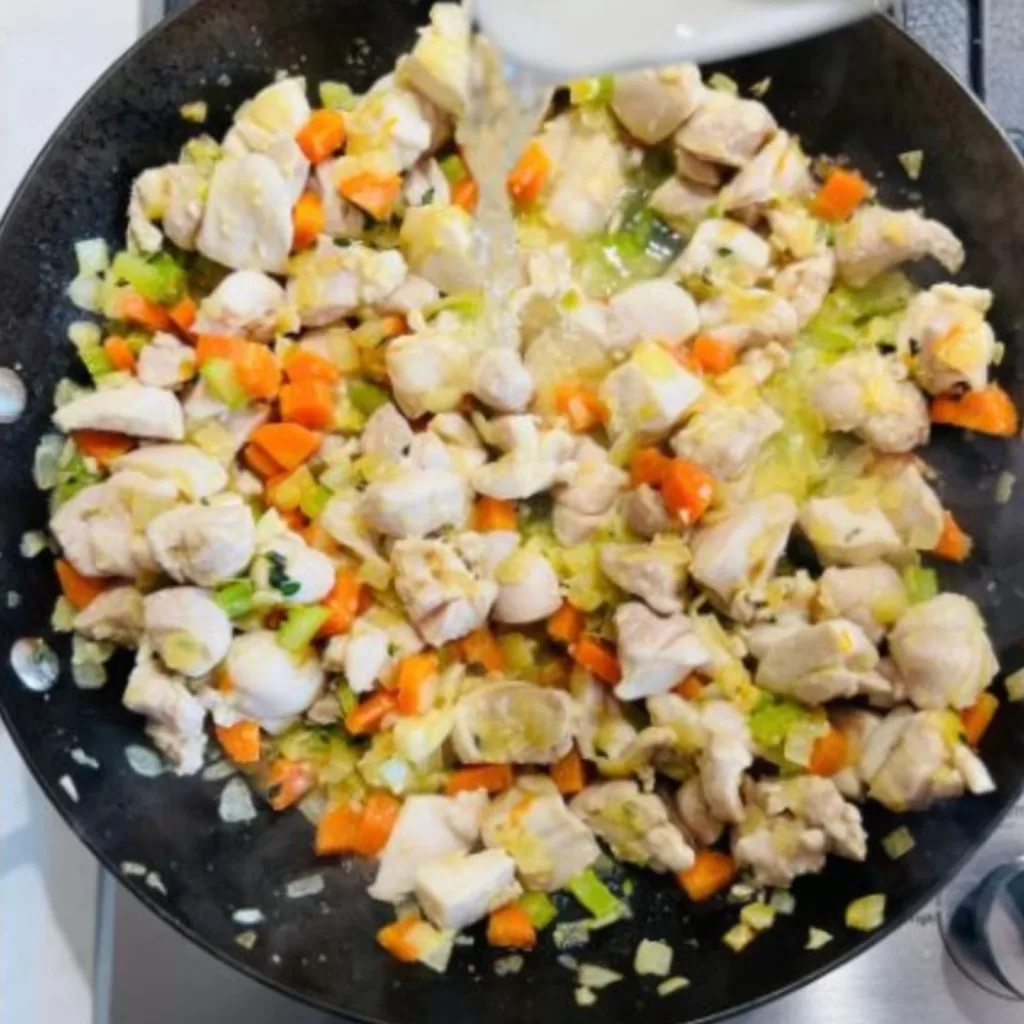
Sauté your veggies, add the chicken, deglaze with wine, thicken the mixture, stir through cream and let it all simmer until rich and creamy. Cool it completely, then spoon the filling into shortcrust-lined tins, top with Camembert and seal with puff pastry lids. Bake until golden and flaky.
Tips for perfect Chicken and Camembert Pies
- Use chicken thigh for extra flavour and tenderness
- Make a double batch – the effort is almost the same
- Cool the filling completely so your pastry stays crisp
- Split the process by making the filling one day and assembling the next
- Thicken with cornflour if needed
- Use a good-quality shortcrust – it makes a big difference
- Brush pastry with egg yolk for a golden, glossy top
Serving suggestions
These pies are a meal on their own, but they’re even better paired with something fresh or something cosy. Try a crisp green salad, steamed greens or buttery mashed potato. They also sit beautifully next to roasted veggies, potato wedges or a spoonful of cranberry sauce or chutney for a sweet little lift.
Storage
Once baked, the pies keep well in the fridge for up to three days and freeze perfectly for around three months. Cool them completely first, then wrap well and freeze. To reheat, thaw overnight in the fridge, warm through in the microwave, then crisp up in a hot oven for that freshly baked finish.
FAQ’s
Can I make the pies ahead of time?
You sure can! You can make the filling up to 2 days in advance before assembling the pies OR you can freeze it for longer storage until ready. The pies can also be baked and frozen for later use.
Can I freeze the pies?
Yes! Once baked, allow to cool completely. Wrap in a layer of plastic wrap, then a layer of foil. Place into a large zip-lock bag, label, date and freeze for up to 3 months. Thaw in the fridge overnight before gently reheating. To reheat, microwave pies until hot then bake in a 180C oven for 10 minutes to crisp up. Alternately, heat in a 160C oven until piping hot, about 20-25 minutes.
Can I use chicken breast?
Yes you can. It won’t be quite as tender as thigh fillet but will still be amazing.
I can’t use wine, can I use something else?
Of course. Replace with extra chicken stock or use water.
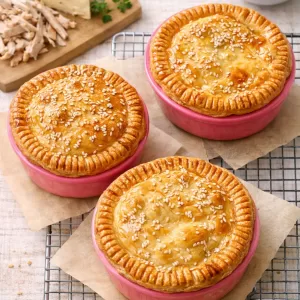
chicken and camembert pies
More recipes you might like to try:
- Spinach & Feta Quiche with Wholemeal Pastry
- Tuna Jalousie with Sweet Corn
- Amazing Zucchini & Bacon Slice
- Savoury Cheese Crescent
- Deep-Dish Roasted Vegetable Quiche (With Fillo)
Chicken & Camembert Pies
Equipment
- 6 Pie tins (mine had a 7.5cm base width)
Ingredients
- 40g butter
- 1 each of onion, carrot and celery stick, cut into 1cm dice
- 3 cloves garlic, finely chopped
- 2 teaspoons fresh thyme leaves (or ½ teaspoon dried thyme)
- 750g chicken thigh fillets, cut into bite sizes cubes
- ⅓ cup white wine
- ¼ cup plain flour
- 1 cup chicken stock
- ½ cup thickened cream
- 1 tablespoon chopped fresh parsley
- 3 sheets frozen shortcrust pastry, thawed
- 3 sheets frozen puff pastry, thawed
- 200g camembert cheese, cut into 18 chunks
- 1 egg, lightly beaten
- 2 teaspoons sesame seeds (optional)
Instructions
TO MAKE THE FILLING
- Melt butter in a lage frying pan over medium heat. Add the onion, carrot and celery and a good pinch of salt. Saute for 5-6 minutes or until nicely softened but not coloured. Add the garlic and thyme, cook 1 minute.
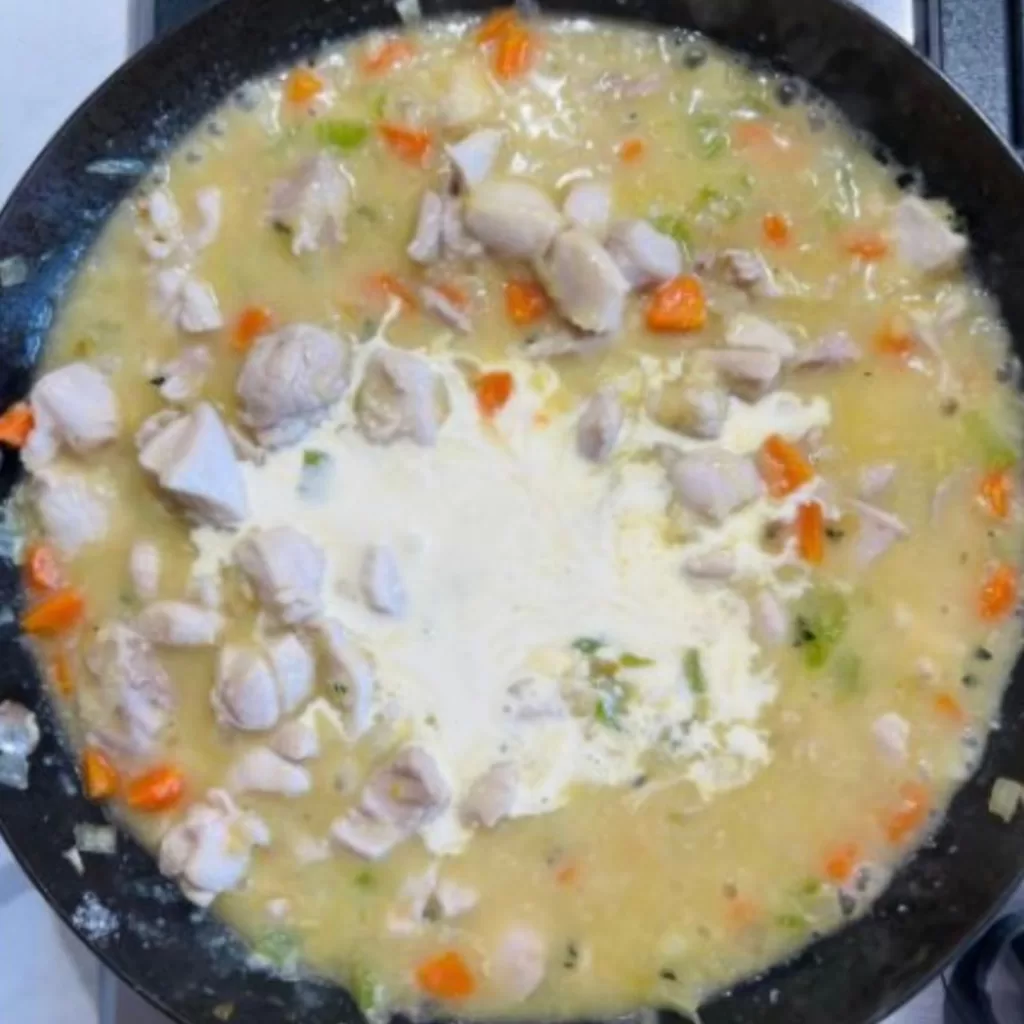
- Increase heat to medium high then add the chicken. Cook, stirring often for 5-6 minutes or until chicken is sealed all over and has turned white. Pour in the wine and allow it to bubble up and reduce by half.
- Sprinkle the flour over the mixture and cook, stirring for 1 minute. Gradually pour in the stock, while constantly stirring, until throughly combined. Bring to the boil then stir through the cream.
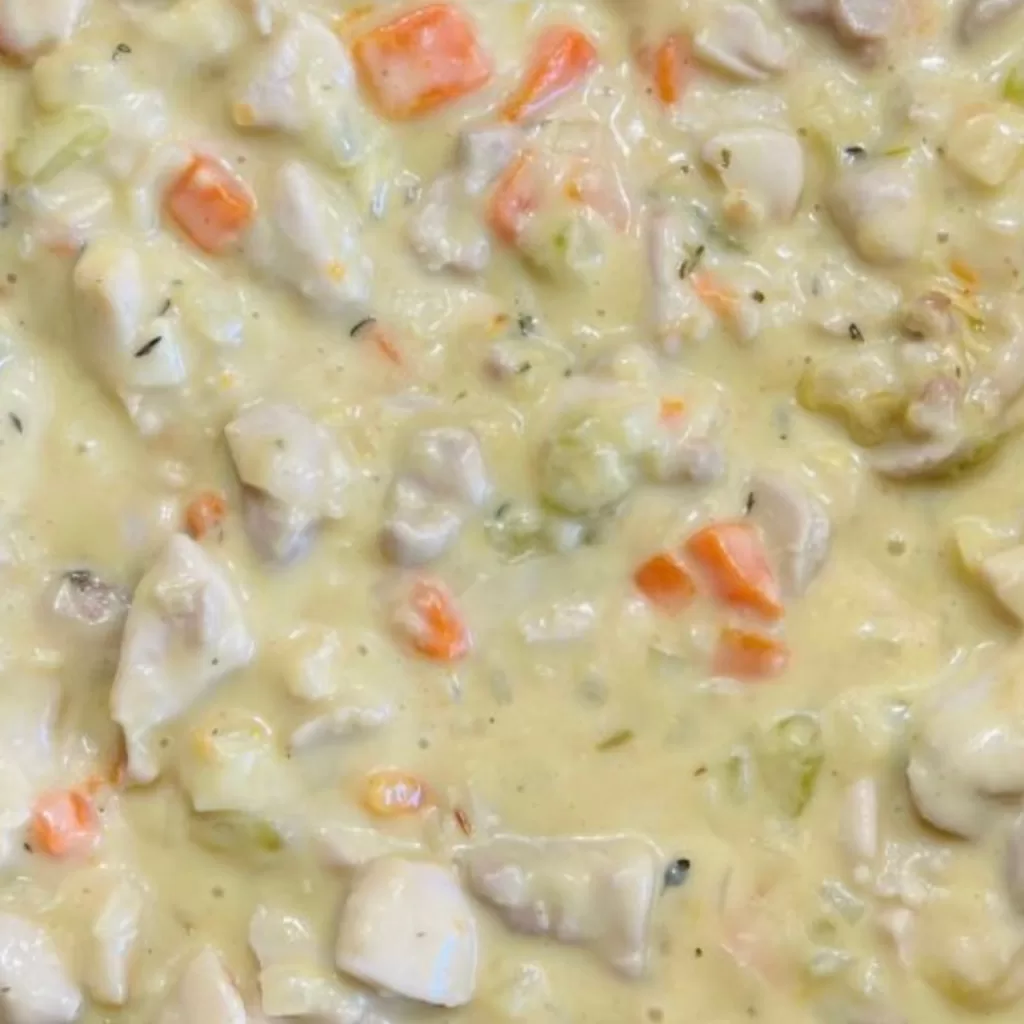
- Reduce heat and simmer for 15 minutes or until the mixture has thickened and chicken is cooked through. Season to taste with salt and ground white pepper. Transfer mixture to a bowl, stir in the parsley and allow to cool completely.
TO ASSEMBLE THE PIES
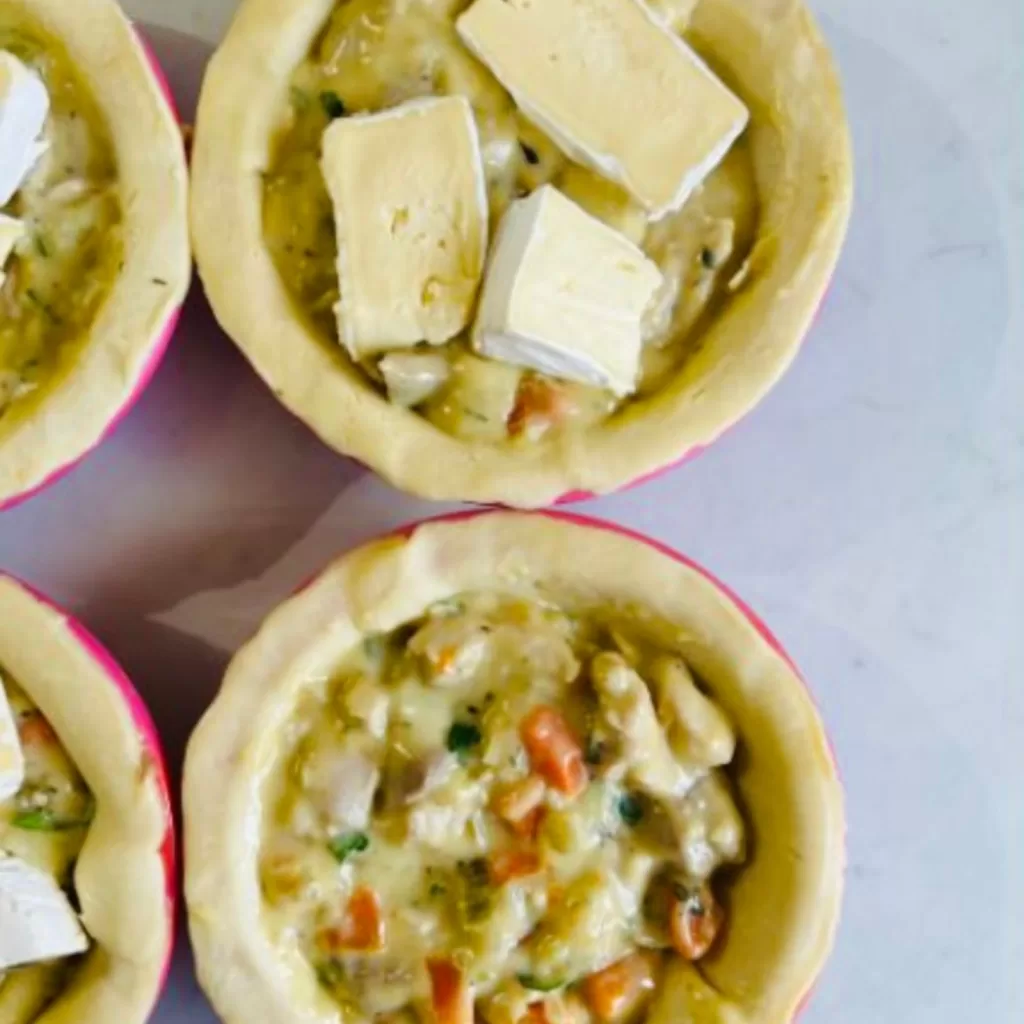
- Place a baking tray into the oven and preheat to 200C (180C fan forced). Lightly grease 6 pie tins with non-stick cooking spray. Cut 6 circles from the shortcrust pastry and use to line base and sides of pie tins. Cut 6 rounds from the puff pastry and set aside (see notes below on pie tins).
- Divide the pie filling evenly between tins then top each with 3 chunks of camembert.
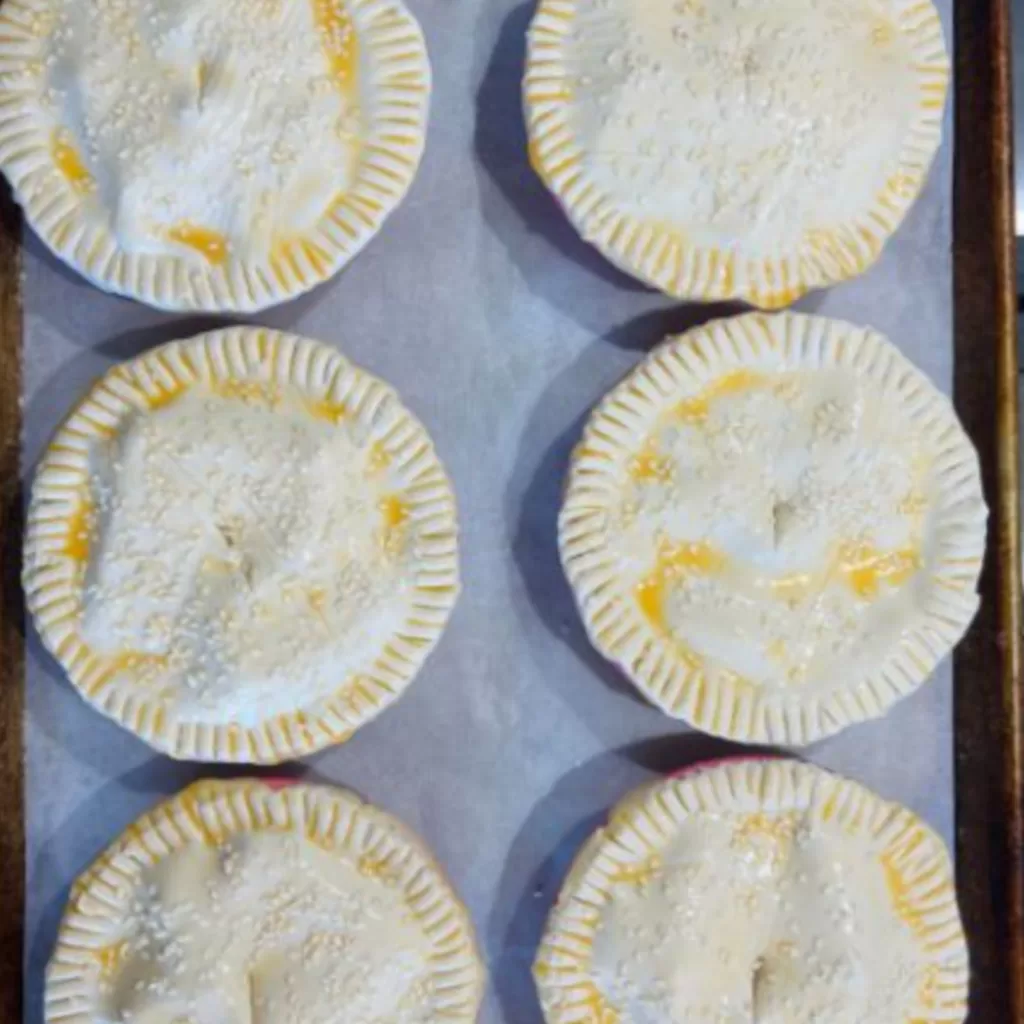
- Brush the pastry rims with water then place a puff pastry disc on top of each pie. Press the pastry edges firmly together to seal or use a fork to crimp. Make 2 slits in the top of each pie (to allow steam to escape) and brush tops with beaten egg. Sprinkle with sesame seeds if using.
TO BAKE THE PIES
- Transfer pies onto the hot baking tray. Bake in the oven for 25-30 min or until golden brown. Stand in tins for at least 10 minutes before serving. Serve with oven baked fries and a mixed green salad.
Notes
- COOKS NOTES:
Oven Temps: Oven temperatures are for conventional, if using fan-forced (convection), reduce the temperature by 20˚C.
Measurements: We use Australian tablespoons and cups: 1 teaspoon = 5 ml, 1 tablespoon = 20 ml & 1 cup = 250 ml.
Herbs: All herbs are fresh (unless specified) and cups are lightly packed.
Vegetables: All vegetables are medium size and peeled, unless specified.
Eggs: We use extra-large size and eggs are 55-60 g each, unless specified. - PIE TINS
I use standard individual pie tins (mine were an old Coles Breast Cancer Awareness set, but the current black ones are the same size). Woolworths sells similar tins, and any standard pie tin will work. You can also use ramekins, Texas muffin tins, regular muffin tins (for party-pie size), or any small pie dish you already have. - OTHER SIZE OPTIONS
This recipe also works beautifully as one large family pie, or in a pie maker if you have one. If using a pie maker, follow your machine’s instructions — you’ll usually get more smaller pies using this method - LINING PIE TINS WITH PASTRY
Measure your pie tins from edge to edge (including the lip), pressing the tape measure down into the tin so you capture the full width. Find a bowl or object with a similar diameter and use it as a guide to cut six rounds from the shortcrust pastry (two rounds per sheet). Do the same for the lids: measure the top of the tin and cut six rounds from the puff pastry. Any leftover pastry can be used for decorative shapes, twists or mini tarts. -
STORAGE OF PIES
Fridge: Baked pies will keep for up to 3 days in an airtight container.
Freezer: Cool completely, wrap in plastic wrap then foil, and store in a zip-lock bag for up to 3 months.
Reheating: Thaw overnight in the fridge. Microwave until hot, then bake at 180°C for 10 minutes to crisp the pastry. Alternatively, reheat in a 160°C oven for 20–25 minutes or until piping hot.
Leave a Reply